Thursday, December 27, 2007
Bryce Canyon

SharePoint V3: Modify Advanced Search Box Result Types
By default, the Advanced Search Box offers a Result Type filter that allows users to select which type of documents they want returned in their search query.
By default, the options are:
* All Results
* Documents
* Word Documents
* Excel Documents
* Presentations
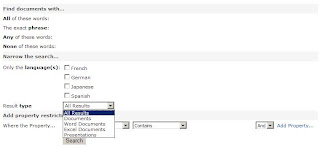
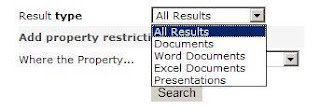
You would like users to be able to query for PDF Documents, too.
Solution:
* Site Actions > Edit Page > Advanced Search Box > Edit > Modify Shared Web Part
* Expand the Properties node > Click on Properties elipses
* Open Visual Studio > File > New File > XML File
* Copy the XML into Visual Studio
* Locate the Result Type node for Word Documents, Copy it, Modify it for PDF
Friday, December 07, 2007
Links: Public SharePoint Web Sites
http://www.wssdemo.com/Pages/websites.aspx
Thursday, December 06, 2007
Links: Arx CoSign Electronic Signature Flash Demos
This link provides some demonstrations on the Arx CoSign product: http://www.arx.com/products/cosign_flash_demos.php
Monday, December 03, 2007
SharePoint V3: Error: IE Script Error When Saving Docs With Office 2003
Server: Microsoft Office SharePoint Server 2007
Client: Microsoft Office Professional 2003
Other: MOSS 2007 document library configured with content types
Description:
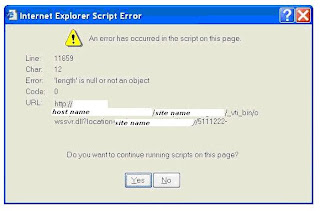
A MOSS 2007 document library is configured to use content types. A client machine with MS Office 2003 saves a document to the library and receives a script error (shown below):
" Internet Explorer Script Error, An error has occurred in the script on this page. Error: ‘length is null or not an object’. "
After continuing to save beyond the script error, changes to the content of the document are saved, however, document library metadata values are reset.
Steps to Re-Create Issue:
* From a computer which has Office 2003, browse to a SharePoint Server 2007 document library which has content types
* Open the document in Edit mode
* Make an edit to the document
* File, Save
* Script error appears
* Click yes to the error until it disappears
* Open the document, notice the changes to the document were saved
* Open the document properties, notice the metadata values have been reset
Solutions:
No "fixes" are currently available, but there are a few workarounds:
1. Upgrade to Office 2007
2. Don't use content types
3. Wait for a hotfix (possibly in the February 2008 time frame)
Reference:
MSDN Discussion
http://207.46.236.188/msdn/rss.aspx?postid=2105089&forumid=1202&siteid=1
Saturday, December 01, 2007
Links: Visio Stencils for Designing Sites, Processes, SharePoint
http://www.nickfinck.com/stencils.html
Visio stencils for designing Sharepoint sites
http://demiliani.com/blog/archive/2006/01/23/3398.aspx
Visio template and stencil for designing SharePoint sites (beta) http://blogs.msdn.com/roberdan/archive/2006/03/05/543967.aspx
Wednesday, November 28, 2007
SharePoint V3: Adjusting Maximum Upload Size
Central Administration > Application Management > Web Application General Settings > Maximum Upload Size (Default is 50MB, Maximum is 2047MB)
Friday, November 23, 2007
SharePoint V3: How to Change the Site Access Requests Recipient Email Address
Change recipient email address:
Site Actions > Site Settings > Modify All Site Settings > Advanced Permission > Settings > Access Requests
"Allow requests for access" - Select Yes/No
"Send all requests for access to the following email address" - (Provide Email Address)
How to change the recipient of site access requests at the sub-site:
1.
Break inheritance to enable the Settings menu:
Site Actions > Site Settings > Modify All Site Settings > Advanced Permission > Actions > Edit User Permissions
2.
Modify the recipient email address for access requests:
Site Actions > Site Settings > Modify All Site Settings > Advanced Permission > Settings > Access Requests
Tuesday, November 20, 2007
SharePoint V3: How to Locate the Recycle Bin Settings for a Web Application
Central Administration > Application Management > Web Application General Settings
Recycle Bin
Recycle Bin Status:
On
Off
Delete Items in the Recycle Bin:
After X Days
Never
Second Stage Recycle Bin:
Add X percent of live site quota for second stage deleted items
Off
Wednesday, October 31, 2007
SharePoint V3: Error: Shared Services Provider creation failed
When creating a new Shared Services Provider in a MOSS 2007 farm, the SSP creation results in an error:
"Failure! Shared Services Provider creation failedReason: Timed out waiting for Shared Services Provider 'SSPName' provisioning timer job to startCheck the event log for details. Note: SSP provisioning will be retried periodically. If you correct the error that caused this failure, provisioning will subsequently succeed. To stop provisioning from being retried, delete the SSP."

The SSP remains in "Provisioning" status.
SOLUTION:
Exam the event viewer for errors.
Refer to Microsoft KB article number 934838,
http://support.microsoft.com/kb/934838. If the failure error is being caused by a service account login failure, then use stsadm.exe to update the password of the service account.
Once the underlying issue is resolved, SSP will complete the provisioning process automatically.
Monday, October 22, 2007
SharePoint V3: Patches: KB934525 (WSS V3), KB937832 (MOSS 2007)
http://support.microsoft.com/kb/942017
Downloads:
** 32 Bit
KB34525: Security Update for Windows SharePoint Services 3.0 (KB934525)
KB937832: Security Update for Microsoft Office SharePoint Server 2007 (KB937832)
** 64 Bit
KB34525: Security Update for Windows SharePoint Services 3.0 (KB934525)
KB937832: Security Update for Microsoft Office SharePoint Server 2007 (KB937832)
INSTRUCTIONS
Shane Young; Please install the SharePoint updates on your server
http://msmvps.com/blogs/shane/archive/2007/10/18/please-install-the-sharepoint-updates-on-your-server.aspx
Andrew Connell; Update your SharePoint servers with KB934525 (WSS v3) and KB937832 (MOSS 2007) http://andrewconnell.com/blog/archive/2007/10/20/Update-your-SharePoint-servers-with-KB934525-WSS-v3-and-KB937832.aspx
Joel Oleson; SharePoint FAQ on DST and October 9th Public Update
http://blogs.msdn.com/joelo/archive/2007/10/16/sharepoint-faq-on-dst-and-october-9th-public-update.aspx
Friday, October 19, 2007
SharePoint V3: Error: Your Client Does Not Support Opening This List In Windows Explorer
SharePoint V3: Error: Your Client Does Not Support Opening This List In Windows Explorer

Users who are running IE 6 are are unable view SharePoint document libraries in Windows Explorer view. Users who have IE 7 do not have this problem.
SOLUTION:
IE 6 doesn't support Windows Explorer View when the URL is more than 100 character URLs. If it is not feasible to upgrade to IE 7, there are a couple KB articles that explain the details and provide instructions to obtain a patch that remedies this issue.
KB 923906
When you try to open a folder in a Windows SharePoint Services 3.0 document library in Explorer View, the folder does not open
http://support.microsoft.com/kb/923906
KB 325355
You cannot access Word documents by using Outlook Web Access on a server that is running SharePoint Portal Server
http://support.microsoft.com/kb/325355/
SharePoint V3: Recover Site Collection from SQL DB Backup
* SharePoint Central Administration > Operations > Backup and Restore
Perform a full farm backup
* SharePoint Central Administration > Application Management > Create or Extend Web Application
* Create a new Web Application
It doesn't matter what you name this database, it will be deleted in a later step
* SharePoint Central Administration > Application Management > Content Databases
You will see that the number of sites is 0 because there are no site collections associated with this web application yet
* SQL Management Studio
* Locate the content database backup which contains the site collection you would like to restore
* Restore this content database, overwriting the one you created for your new web application
Here is where you want to be concious of the name you give the restored database. I like to name the first content database for a web application WSS_WebApp_WebAppName and subsequent content databases for the web application as WSS_SiteCollection_SiteCollectionName.
* Attach the restored content database to the new web application
C:\Program Files\Common Files\Microsoft Shared\web server extensions\12\BIN> Stsadm.exe –o addcontentdb –url http://servername –databasename databasename –databaseserver servername
* SharePoint Central Administration > Application Management > Content Databases
You will now see the content database you restored. The number of sites should be 1 if there was originally 1 site collection in that database when it was backed up.
* Navigate to the URL of the new web application. Verify that the site collection was restored and is
functioning properly
* IIS Management
Note all IIS settings for the original web application including host headers and ip addresses of the IIS web site
* SharePoint Central Administration > Operations > Alternate Access Mappings
Note all of the AAM's for the original web application
* SharePoint Central Administration > Application Management > Delete Web Application
Delete the original web application
* SharePoint Central Administration > Operations > Alternate Access Mappings
Add all of the necessary AAM's to the new web application, make sure the default AAM is fully qualified
* IIS Management
Update the IIS web site for the new web application with all necessary host headers. If the original web application had its own unique, internal ip address asssigned to it, then assign that ip address to the new web application
* Test the URLs for the restored site collection
Wednesday, October 17, 2007
SharePoint V3: Stsadm.exe Backup Script
Create a backup directory for storing the scheduled SharePoint backups (e.g. c:\backupsharepoint)
Create Bat File Directory
Create a directory for storing the backup script file (e.g. c:\scriptssharepoint)
Create Bat File
Create a bat file using the code below, modified for your environment. Use UNC paths when using in a server farm environment.
@echo off
echo ====================================================
echo Backup Script For Office SharePoint Server 2007
echo ====================================================
cd \program files\common files\microsoft shared\web server extensions\12\bin
@echo off
stsadm.exe -o backup -url http://servername -filename c:\backupssharepoint\backupsharepoint.dat -overwrite
@echo off
echo completed
Schedule bat file
Schedule the backup to run frequently, during off peak hours.
Open Start > Programs > Accessories > System Tools > Scheduled Tasks
Add a Scheduled Task
Scheduled Task Welcome Screen, Click Next
Click the program you want Windows to run, Click Browse
Select the backupsharepoint.bat file you created (e.g. c:\scriptssharepoint\backupsharepoint.bat)
Name the task, Schedule it (e.g. Daily)
Start Time, Frequency, Start Date
Username and Password (use a domain user account that has proper permissions and non expiring password )
Finish
Verify Backups
Keep the backup directory secure. Monitor the job to ensure the job is running properly. Perform test restores from the backup files.
Click Here if you need similar instructions for SharePoint Portal Server 2003.
Microsoft Download Center: 2007 Office System Document: Developer Posters
-Developer Roadmap for the 2007 Microsoft Office System
-Microsoft Office InfoPath 2007 Managed Object Model Poster
-Developer Map for SharePoint Products and Technologies Poster
Monday, October 15, 2007
SharePoint V3: Basic Backup Plan Using Out of Box Tools
Backup
1.
Using the SharePoint Central Admin Backup/Restore Utility, perform a full farm backup after each time you make configuration changes to the SharePoint farm. This backup will protect most of the farm configurations.
2.
Schedule an stsadm.exe backup script to run at least daily on each site collection. These backups will protect the site collections and their content.
3.
Create a SQL Server maintenance plan to backup all databases and transaction log filres on a regular schedule. SQL database backups can be also used to recover site collections. SQL backups also protect farm configurations.
Restore
To test a full restore, you can first restore the farm using the SharePoint Central Administration Backup/Restore Utility. Next, you can restore each site collection from the latest backups using stsadm.exe. This should get you to to a healthy state, as of the time of your latest site collection backup.
You may also want to test restoring a content database by creating a new web application on the farm, restoring a content database backup in SQL, then running the stsadm.exe command for attaching the content database to the new web application. Run iisreset /noforce then try hitting the restored site collections from the browser.
SharePoint V3: 64 bit PDF iFilter
Wednesday, October 03, 2007
SharePoint V3: Technique for Creating Branded Site Template
I start by creating the first web application and site collection. Next, I create the custom master page and CSS file. I upload the necessary images and logos to the publishingimages or sitecollectionimages directories of the site collection.
Once I have the site collection looking the way I want, then I use stsadm to backup the site collection. Then, I create a new web application and restore the sts backup. Now I don't have to brand the second site collection manually.
SharePoint V3: Pros and Cons of Managing Users and Groups
Provisioning SharePoint sites using Active Directory users:
Pros:
* Site Members web part displays the names of the users
* Provisioning can be delegated to site owners instead of IT
* User names and respective permission levesls are visible on Permissions screen
Cons:
* Portals with large memberships require a lot of maintenance
* Sub-sites that do not inherit security from parent require a lot of maintenance
* Adding and Removing members requires constant maintenance
Provisioning SharePoint sites using Active Directory groups:
Pros:
* Administration can be done completely from Active Directory
* Mail-enabled security groups provide a way to delegate group membership to people who are not AD administrators (they can manage memberships through Outlook global address book)
* Can nest AD groups within other AD groups to automate the process of provisioning users in SharePoint sites
Cons:
* Site members web part will display group names but not user names
* It isn't possible to view user membership from the SharePoint site permissions page, only group names appear
* Detailed security audit requires parsing multiple queries to Active Directory and SharePoint
SharePoint V3: Out of Box Options for Backing MOSS 2007 Farm Configurations
1.
SharePoint Central Administration Backup/Restore Utility
Central Admin > Operations > Backup and Restore
Caveats:
Cannot be scheduled
2.
STSADM.EXE
Program Files > Common Files > Microsoft Shared > Web Server Extensions > 12 > Bin > stsadm.exe
a. Identify the components you would like to backup
stsadm.exe -o showtree
b. Perform Backup Operation
stsadm.exe -o backup -directory file://servername/backup_share_name -backupmethod full -item farm -backupthreads 1
Caveats:
Cannot backup the following:
Configuration Database
Central Administration web application
Shared Services Provider web application
Shared Services Provider database
User Profile Application
Shared Services Index
Shared Services Provider Search database
Search Instance
WSS Search database
Sunday, September 09, 2007
SharePoint V3: Achieving Checked-In Status When Uploading Mulitple Documents
After uploading multiple documents to a document library, you find that the documents are all checked-out. In situations such as a document migration where you are uploading several documents at one time you may not want all of the documents uploaded with a checked-out status because its time consuming to go and check-in each one manually.
Solution:
Prior to doing an upload, disable the setting that require documents to be checked out before they can be edited.
How to do this:
1. Document Library > Settings > Document Library Settings > Versioning Settings"Require documents to be checked out before they can be edited?"
Set this to "No" while doing migration
2. Upload the documentsDocument Library > Upload > Upload Multiple Documents
3. If desired, change the setting back to require documents to be checked out before they can be edited. This will force future document edits to require check-out. It is practical to have this set when working with documents one by one. It isn't practical to have it set during file migrations.
For more information:
http://njbblog.blogspot.com/2009/08/sharepoint-30-clarifying-check-out.html
Monday, August 20, 2007
Access Services for SharePoint
Excel client...Excel Services
Access client...uh?
As SharePoint implementations evolve beyond content management and collaboration, there is often a need for custom applications with normalized data models. SharePoint's AllUserData table just doesn't cut it some times.
The business data catalog certainly enhances existing applications, but I think there is a real demand to replace those systems or create new ones. I also think that the value proposition for doing this type of thing with the current SharePoint product line is weak because it requires a lot of custom development.
I think Microsoft should provide the marketplace with Access Services for SharePoint. Perhaps such a feature could provide a way to upsize Access applications to SharePoint, upgrading the Access forms to ASP.NET web part pages and databases to SQL Server.
Sunday, August 05, 2007
July 24 2007 NERSUG
The slides for this presentation have been posted to www.jornata.com and can be downloaded here.
Sunday, July 22, 2007
Links: SharePoint V3: Search: Style Sheets
http://msdn2.microsoft.com/en-us/library/ms550732.aspx
Enterprise Search Core Results XSLT Transformation
http://msdn2.microsoft.com/en-us/library/ms584121.aspx
How to: Change the Properties Returned in the Core Search Results
http://msdn2.microsoft.com/en-us/library/ms560074.aspx
How to: View and Edit the Search Results XSLT Transformation
http://msdn2.microsoft.com/en-us/library/ms544191.aspx
Sample: Search Core Results Web Part XSLT
http://msdn2.microsoft.com/en-us/library/ms562390.aspx
Links: SharePoint V3: Search: BDC
http://msdn2.microsoft.com/en-us/library/ms492695.aspx
SharePoint 2007: BDC - User Profiles
http://blah.winsmarts.com/2007-4-SharePoint_2007__BDC_-_User_Profiles.aspx
Walkthrough: Configuring Search for the AdventureWorks Business Data Application Sample
http://msdn2.microsoft.com/en-us/library/ms493671.aspx
Links: SharePoint V3: Search: Search Center
http://www.codeproject.com/spoint/MOSS_Advanced_Search.asp?print=true
How to: Change the Properties Returned in the Core Search Results
http://msdn2.microsoft.com/en-us/library/ms560074.aspx
How to: Display a Search Scope in the Search Box and Advanced Search Web Parts
http://msdn2.microsoft.com/en-us/library/ms498872.aspx
Walkthrough: Add a Tab and Custom Search Page with Enterprise Search Web Parts to the Search Center
http://msdn2.microsoft.com/en-us/library/ms584031.aspx
Links: SharePoint V3: Search: Planning
http://technet2.microsoft.com/Office/en-us/library/e8c0fccd-8364-4352-8778-c9c46a668b701033.mspx
Plan for administrative and service accounts (Office SharePoint Server
http://technet2.microsoft.com/Office/en-us/library/f07768d4-ca37-447a-a056-1a67d93ef5401033.mspx?mfr=true
MOSS Search - Customer Proof of Concept Scoping and Typical Tasks
http://blogs.msdn.com/miketag/archive/2007/01/18/moss-search-customer-proof-of-concept-scoping-and-typical-tasks.aspx
SharePoint Deployment Capacity & Performance Planning 2003 & 2007
http://blogs.msdn.com/joelo/archive/2006/07/19/671789.aspx
Estimate performance and capacity requirements for search environments
http://technet2.microsoft.com/Office/en-us/library/5465aa2b-aec3-4b87-bce0-8601ff20615e1033.mspx?mfr=true
Estimate performance and capacity requirements for Internet environments (Office SharePoint Server)
http://technet2.microsoft.com/Office/en-us/library/45997bad-da15-4442-8727-78e0f2dc5a9c1033.mspx?mfr=true
Estimate MOSS Search Disk Space Requirements
http://blogs.msdn.com/miketag/archive/2007/07/05/estimate-moss-search-disk-space-requirements.aspx
Friday, July 13, 2007
SharePoint V1, V2, V3: SharePoint Web Site Prompts User For Windows Credentials
SharePoint web site prompts user for Windows credentials
Solution:
Open Internet Explorer
Tools
Internet Options
Security Tab
Highlight "Local Intranet"
Click Sites
Add SharePoint URLs
Click Close to close Local Intranet
Highlight "Local Intranet"
Click Custom Level
Scroll to the option User "Authentication: Logon"
Set this to "Automatic logon only in Intranet zone"
Click OK to close Security Settings
Click OK to close Internet Options
Navigate Internet Explorer to SharePoint URL
WhitePaper: Microsoft Office Programs and SharePoint Products and Technologies Integration Fair, Good, Better, Best
WhitePaper: Microsoft Office Programs and SharePoint Products and Technologies Integration Fair, Good, Better, Best
Thursday, July 12, 2007
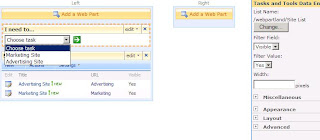
SharePoint V3: Configuring the "I Need To..." Web Part
Title (single line of text)
URL (hyperlink)
Visable (choice, checkbox, yes is only option, yes is default value)

* Add the "I Need To..." web part to a web page
* Modify Shared Web Part
* Click the Change button and set the following fields:
Select custom list (e.g. Site List)
Filter Field: Visible
Filter Value: Yes
Thursday, July 05, 2007
SharePoint V2, V3: Error: Service Unavailable
* This applies to: WSS 2.0, WSS 3.0, SPS2003, MOSS2007
* Service account password had changed.
* Site returns error: "Service Unavailable"
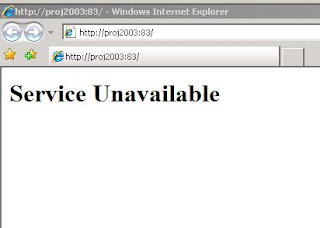
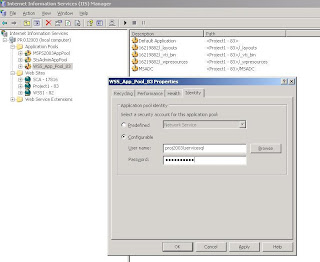
Solution:
IIS Manager > Application Pool Properties > Identity Tab
* Update the service account and password
Start > Run
* IISRESET /noforce
Start > Programs > Administrative Tools > Services
* Update user name and password for any other services registered with this user account
* Restart the updated services
Thursday, June 28, 2007
SharePoint V3: Site Images Appear as Red X
After logging into a SharePoint Web Application, the site images show as red x.

Solution:
* IIS Manager > Application Pool Properties for Web Application > Identity
* Select "Configurable" radio button
* For user name and password, type the domain\username and password of a farm service account
* Run IIS Reset

SharePoint V3: Error: Access Denied When Clicking User Profiles and Properties in SSP
Shared Service Provider > User Profiles and Properties
Error: Access Denied


Solution:
Log into Shared Service Provider web application using an administrator account. In Actions > Site Settings > All Site Settings > Advanced Permissions, add the users to the access list for the site and assign permissions. In Actions > Site Settings > All Site Settings > Site Collection Owners, add the user account as a site collection owner if desired.
Wednesday, June 13, 2007
SharePoint V2: How to Configure and View Diagnostic Logs for Search in SharePoint Portal Server 2003
Central Admin > Component Configuration > Configure Diagnostic Settings

Under Logging Settings, highlight Search Service and click Edit

Modify the logging level (remember to go back afterwards and set it back to avoid using disk space unnecessarily)

Viewing:
Under View Diagnostic Logs, highlight the most recent search log and click View

Monday, June 11, 2007
Links: SharePoint V3: What every SharePoint administrator needs to know about Alternate Access Mappings
Thursday, June 07, 2007
SharePoint V3: Error Importing User Profiles
In Microsoft Office SharePoint Server 2007, after initiating a full user profile import, the user profiles fail to import and the crawl log contains the following error:
"The specified domain either does not exist or could not be contacted. (Exception from HRESULT: 0x8007054B)"
Solution:
Adding WINS addresses to the LAN Connection properties corrected this issue.
1.
From the Index server: Control Panel > Network Connections > LAN Connection Properties > WINS tab
Add WINS server addresses
2.
SSP Admin > User Profile and Properties > Import
Perform user profile import
Verify import is successful
Wednesday, June 06, 2007
SharePoint V2: Adding a New Portal to an SPS 2003 Server Farm
This blog post explains how to add a new portal to a SharePoint Portal Server 2003 farm having two front end web servers.
Solution:
Web Server #1
* From Windows Explorer: Create a directory on a non operating sytem drive to be used for the new IIS web site.
* From IIS Manager: Create a new web site, using the new directory as the home directory. Disable anonymous access.
* From SharePoint Portal Server 2003 Central Administration:
SharePoint Portal Server > Portal Site and Virtual Server Configuration > Create a Portal
Site Name: Give the portal a name, consider using host header or port number in name.
Virtual Server: Select the new IIS web site. Site URL: e.g. http://webserver1:port
Account Name, Email Address
Web Server #2
* From Windows Explorer: Create a directory on a non operating sytem drive to be used for the new IIS web site.
* From IIS Manager: Create a new web site, using the new directory as the home directory. Disable anonymous access.
* From SharePoint Portal Server 2003 Central Administration:
Windows SharePoint Services > Virtual Server Configuration > Extend or Upgrade Virtual Server Provisioning Options > Extend and map to another virtual server Current
Virtual Server: Verify this is set to the web site you want to extend
Server Mapping: Select the virtual server that was created on web server #1 Wait for refresh cache on the other serverse to succeed and click ok.
Tuesday, June 05, 2007
SharePoint V3: Configuring the Author Managed Property
This blog post explains how to configure the Author managed property so that it may be used effectively in Search within an Office SharePoint Server 2007 environment.
Solution:
SSP Admin > Search Settings > Metadata Property Mappings > Managed Properties > Author
Step 1
Set the "Mappings to crawled properties" radio button to "Include values from a single crawled property based on the order specified." It is common to expose the Author property in search results, so don't "include all values from crawled properties mapped" because your search results will end up with mulitple names listed beside the search result and it will be difficult to distinguish which is really the author.
Step 2
Map the most relevant crawled properties to the Author managed property, and position them in the best possible sequence. Obviously, if authors are truly dilligent about maintaining the Office document Author property within the document itself , then this is best candidate for first position. However, in many organizations, this property is not actively maintained. SharePoint's Created By property isn't always an accurate indicator of who actually created the document, so this one also tends to fail as being a reliable first position candidate. In many cases, the best thing to do is to create a custom Author site column, make it required, and add it to all document content types. Then, map the corresponding crawled property as first position. This ensures that the Author information will be maintained to some degree by people touching the documents.
Once the first position is set, then add and order the subsequent crawled properties.

SharePoint V2: Error: Upgrade Pre-Scan Error, Orphaned Site
During preparation for an upgrade to Microsoft Office SharePoint Server 2007, after running prescan.exe on a SharePoint Portal Server 2003 environment, the pre-upgrade report lists an error such as the one below.
06/04/2007 16:26:59 Error: Cannot get content database Id for SPSite: http://servername/sites/sitename
06/04/2007 16:26:59 Microsoft.SharePoint.SPException: There is no Web named "/sites/sitename". ---> System.Runtime.InteropServices.COMException (0x81070504): There is no Web named "/sites/sitename". at Microsoft.SharePoint.Library.SPRequestInternalClass.OpenSite(String bstrUrl, Boolean bGetUrlOnly, String& pbstrServerRelativeUrl, Guid& pgSiteId, Int32& pOwnerID, Int32& pSecondaryContactID, DateTime& pdtLastContentChange, DateTime& pdtLastSecurityChange) at Microsoft.SharePoint.Library.a.a(String A_0, Boolean A_1, String& A_2, Guid& A_3, Int32& A_4, Int32& A_5, DateTime& A_6, DateTime& A_7) --- End of inner exception stack trace --- at Microsoft.SharePoint.Library.a.a(String A_0, Boolean A_1, String& A_2, Guid& A_3, Int32& A_4, Int32& A_5, DateTime& A_6, DateTime& A_7) at Microsoft.SharePoint.SPSite.c() at Microsoft.SharePoint.SPSite.get_ID() at Microsoft.SharePoint.PreupgradeReport.Scan.GetContentDBBySite(SPSite site, SPVirtualServer vs)
Solution:
Windows SharePoint Services 2.0 and SharePoint Portal Server 2003 each have their own approach to cleaning up orphaned records. The KB articles below provide information on related hotfixes and explain how to use command line utilities to clean up corrupted databases.
Windows SharePoint Services 2.0
http://support.microsoft.com/kb/924881
http://support.microsoft.com/kb/918744
From: \program files\common files\microsoft shared\web server extensions\60\bin
To Detect: stsadm -o databaserepair -url http://ServerName -databasename DatabaseName
To Repair: stsadm -o databaserepair -url http://ServerName -databasename DatabaseName -deletecorruption
SharePoint Portal Server 2003
http://support.microsoft.com/kb/919175
http://support.microsoft.com/kb/918742
From: \programfiles\Sharepoint Portal Server\Bin
To Repair: spsadm repairorphans http://ServerName
Friday, June 01, 2007
SharePoint V3: MOSS 2007 Search: How to Index Lotus Notes Content
Preparation:
* Lotus Notes server name
* Lotus Notes database file name
* List of fields you want to display in search results
* Notes user logon file (e.g. user.id)
* User credentials for installing Notes client
Steps:
* Install Lotus Notes Client 6.0 to the SharePoint Index Server
* From the index server, share the c:\program files\lotus\notes\data directory allowing WSS_WPG group access
* From an existing workstation, copy a valid user id file to index server c:\program files\lotus\notes\data
* Download the Lotus C++ API Toolkit 3.0I* Extract the files* Copy lcppn30i.dll to the index server, c:\program files\microsoft office servers\12.0\bin
* Rename 1cppn30i.dll to 1cppn30.dll
* From index server, c:\program files\microsoft office servers\12.0\bin, execute notessetup.exe
* Specify the server name, database file, view, etc.
* From index server, cmd prompt, net stop osearch, then net start osearch
* SSP Admin > Search Settings > Content Sources: Configure content source for Lotus Notes
* SSP Admin > Search Settings > Scopes: Configure scope for Lotus Notes content source
* SSP Admin > Search Settings > MetaData Property Mappings: Create managed properties for those Lotus Notes properties that you want to search or display in search results
* Search Center: Configure the search web parts and search results web parts (and related xml files) to display useful field when the search result item is coming from the Lotus content source
Lessons:
* The notessetup.exe won't work with the 1cppn30i.dll file name, need to rename it to 1cppn30.dll
* I used 6.0 Notes Client, because Notes Client 6.5 did not create a data directory
References:
* Configure Office SharePoint Server Search to crawl Lotus Notes (Office SharePoint Server 2007 for Search)
* Using SharePoint 2007 to Index Lotus
* Secure crawls of Lotus Notes with SharePoint
* How to Configure Search to Honor Lotus Notes Security Settings
* MOSS2007 Search and Index Lotus Notes
* IBM software downloads (for Lotus C++ API ToolKit)
Monday, May 21, 2007
SharePoint V3: Fresh MOSS 2007 Search Configuration for Medium Server Farm
After configuring and starting MOSS Search, you wish to have a clean configuration. Maybe the indexing process doesn't seem to be working correctly. Or, perhaps there are issues with the propogated index share folder. Or, maybe the crawler doesn't seem to complete its process. Or, maybe the first time around you forgot about your database naming convention and you want to rename the search database to something more relevant. Whatever the issue or reason, the solution below offers a way to gain a fresh start with MOSS search configuration. This solution creates a new search database, it clears the index and propogated index file shares and creates new ones.
Solution
From each of the search servers
* Start > Run > CMD
* net stop osearch
From each of the query servers
* Central Admin > Services on Server
* Stop/Remove MOSS Search (query) from each of the query search servers
From the index server
* Central Admin > Services on Server
* Stop/Remove MOSS search (index)
From the index server
* Central Admin > Services on server
* Note the database name
* Stop/Remove WSS search
From the index server
* Central Admin > Services on server
* Start/Add the WSS Search (this requires creating a new db)
From the index server
* Central Admin > Services on server
* Start/Add the MOSS Search (select only the index checkbox)
From each of the query servers
* Central Admin > Services on server
* Start/Add MOSS Search (select only the query checkbox)
From the SSP
* SSP Admin > User Profiles
* Verify that user profiles have been imported
From the SSP
* SSP Admin > Search Settings
* Verify all content sources, crawl rules, schedules, scopes are configured properly
* Perform a full crawl of content
SharePoint Error: Service Unavailable
Users receive "Service Unavailable" error when they point their browsers at the SharePoint site
Solution:
* Administrative Tools > Services > SQL Server Service > Log On Tab
Set the identity to a domain user account
Restart the service
* IIS Manager > Application Pools > Application Pool Properties > Identity Tab
Set the identity to a domain user account (e.g. use same as sql server service account)
* Start > Run > IISReset
See Also:
Microsoft Support KB973917: Description of the update that implements Extended Protection for Authentication in Internet Information Services (IIS) http://support.microsoft.com/kb/973917
SharePoint V3: MOSS 2007 People Search Scope, 0 Items
MOSS 2007 Search is configured but the People scope contains zero items.
Solution:
* SSP Admin > User Profiles and Properties
Verify that user profiles have been imported by looking at the number of profiles
* SSP Admin > Search Settings > Scopes > Scope Properties and Rules
Delete existing rules
Create a new rule where contentclass = urn:content-class:SPSPeople
Set the new rule behavior to "Require"
* SSP Admin > Search Settings > Scopes
Start Update Now
Monday, April 30, 2007
SharePoint V3 Error: The search request was unable to connect to the Search Service
After modifying SharePoint service account identities, searching results in the error: "The search request was unable to connect to the Search Service."

* IIS Manager > Application Pools > App Pool Properties > Identity Tab:
Set the user name and password to the SharePoint Service Account identity
* Start > Run > IISRESET /noforce

Wednesday, April 25, 2007
SharePoint V3: A MOSS 2007 Extranet Scenario of an Internal Parent Site Having Multiple Extranet Sub-Sites
One common extranet configuration of MOSS 2007 is when an organization sets up an internal-only site collection but has multiple external facing sub-sites (perhaps for clients or projects). I have created a sample configuration for this design using a fictitious company called “Wharf Technologies.” This example assumes the following:
* There is one set of internal users (e.g. Wharf employees)
* There are multiple sets of external users (e.g. clients)
* Users and groups are managed in Active Directory
* There is one root site collection called “Wharf Technologies Portal”
* There are many client sub-sites, one per client
* Wharf employees are supposed to have access to the Wharf Technologies Portal, plus all of the client sub-sites
* Wharf clients are not supposed to have access to the Wharf Technologies Portal; they should only have access to their client site
* For demonstration purposes, one of the client organizations is called Awesome Computers
* The Site Collection Administrators and Portal Owners have already been provisioned on the Wharf Technologies Portal
* The URL for the Wharf Technologies Portal is http://portal.wharf.com
* The Awesome Computers sub-site has already been created, the URL is http://portal.wharf.com/sites/awesomecomputers
* Each client site should have its own URL, available outsidse the Wharf network
Setting up something like this requires several network and SharePoint configurations. Below are steps outlining one approach to achieving these configurations in a sample environment. Keep in mind that there are many different approaches achieving the requirements and this is just one example. In real life you need to consider information security and corporate compliance policies and procedures of both the company hosting the web site and the client companies.
From Active Directory Users and Computers:
Create an AD security group called Wharf Technologies Users
Create an AD security group called Awesome Computers Users
From the Wharf Technologies Portal Site:
Actions > Site Settings > Modify All Site Settings > Advanced Permissions > New > Add Users
Add the Wharf Technologies Users AD group
Give Permissions Directly (Contribute)
Uncheck the option to send welcome e-mail to the new users
Click OK
From the Awesome Computers Sub-Site:
Site Actions > Site Settings > Advanced Permissions > Actions > Edit Permissions
Click OK to the warning message regarding unique permissions
New > Add Users
Add the Awesome Computers Users AD groupGive Permissions Directly (Contribute)
Uncheck the option to send welcome e-mail to the new users
Click OK
At this point the Awesome Computers have access to their site, but not the root site collection.
From Internet Information Services Manager:
Create a new web site called Awesome Computers
On the Web Site tab, provide a host header, awesomecomputers
On the web site tab, set the “content for this resource should come from:” option to “A redirection to URL”
For the “client will be sent to” option, check off “the exact URL entered above”
Set the “redirect to:” field to http://portal.wharf.com/sites/awesomecomputers/default.aspx
From Active Directory DNS:
Create an alias record mapping awesomecomputers host name to the host name of the Wharf Technologies Portal (e.g. portal.wharf.com)
From Internet Explorer:
Test the redirection web site, awesomecomputers.wharf.com should resolve to the Awesome Computers sub-site
From SharePoint:
If any custom branding has been applied, ensure that NT Authenticated Users group or a similar group has permission to the master page and css files. This will ensure that the branding is visible to the client users.
At this point users should be able to point their browser to http://awesomecomputers.wharf.com and be redirected directly to the Awesome Computers sub-site of the Wharf Technologies Portal.
The next configuration is to establish public facing access to the Wharf Technologies Portal ip address, port number, and establish external name resolution to the Awesome Computers host name. The configuration requirements of public ip address and name depend on the network hardware that is being used on the network perimeter and therefore vary from organization to organization. External DNS Name propagation make take several hours to complete since it must be updated at the service provider.
The end result is that each client site that is configured is accessible from outside the network, each having their own unique URL, and SharePoint permissions is set up such that client users can only access their own sites.
Monday, April 16, 2007
SharePoint V3: Configure BDC Search Scope, Add Search Tab, Modify Search Scopes Drop Down
The instructions below explain how to create a custom search scope for the Adventure Works DW SQL Database, how to add an Adventure Works search tab, and how to add Adventure Works to the search scopes drop down. This example assumes that the Adventure Works database has already been defined in the Business Data Catalog.
Create and Configure the Adventure Works Search Scope
SSP > Search Settings > Scopes > View Scopes > New ScopeTitle: Adventure WorksTarget Results Page: Use the Default Search Results Page (for now)Click OK
Adventure Works Search Scope > Edit Properties and Rules > Rules > New RuleScope Rule Type: Content SourceContent Source: AdventureWorksDWBehavior: IncludeClick OK
Create Adventure Works Search and Search Results Pages
Navigate to the Search Center
Site Actions > View All Site Content > Pages > New > Page
Title: aw.aspx
URL: Pages/aw.aspx
Page Layout: Search Page
Click Create
Site Actions > View All Site Content > Pages > New > Page
Title: awresults.aspx
URL: Pages/aw.aspx
Page Layout: Search Results Page
Click Create
Configure the Adventure Works Search and Search Results Pages
Open the aw.aspx pageSite Actions > Edit PageSearch Box Web Part > Edit > Modify Shared Web Part > Miscellaneous
Target Search Results Page URL: awresults.aspx
Click OK
Open the awresults.aspx page
Site Actions > Edit PageSearch Core Results Web Part > Edit > Modify Shared Web Part > Miscellaneous
Scope: Adventure Works
Create and Configure the Adventure Works Search Tabs
Open the search.aspx page
Site Actions > Edit Page > Tabs > Add New Page
Tab Name: Adventure Works
Page: aw.aspx
Open the searchresults.aspx
Site Actions > Edit Page > Tabs > Add New Page
Tab Name: Adventure Works
Page: awresults.aspx

Update the advanced search links on each custom search page
Modify the Search Scopes Drop Down
Home > Site Actions > Site Settings > Modify All Site Settings > Site Collection Administration > Search Scopes
Click "Display Group: Search Dropdown"
Edit Scope Display Group
Enable the Adventure Works scope by checking it and assigning it an order number

Friday, April 06, 2007
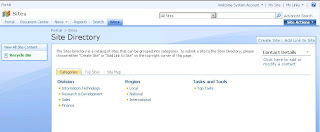
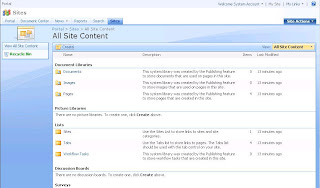
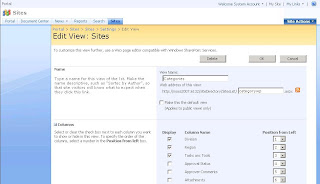
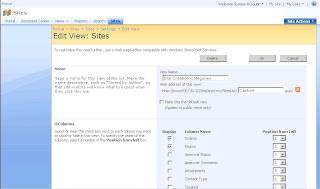
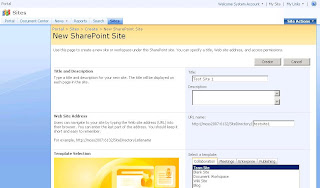
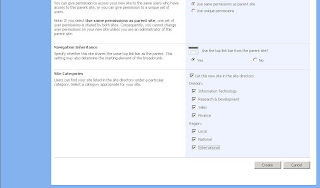
SharePoint V3: How the Site Directory Works
Blog Archive
-
▼
2007
(80)
-
►
October
(11)
- SharePoint V3: Error: Shared Services Provider c...
- SharePoint V3: Patches: KB934525 (WSS V3), KB937...
- SharePoint V3: Error: Your Client Does Not Suppo...
- SharePoint V3: Recover Site Collection from SQL D...
- SharePoint V3: Stsadm.exe Backup Script
- Microsoft Download Center: 2007 Office System Doc...
- SharePoint V3: Basic Backup Plan Using Out of Box...
- SharePoint V3: 64 bit PDF iFilter
- SharePoint V3: Technique for Creating Branded Sit...
- SharePoint V3: Pros and Cons of Managing Users an...
- SharePoint V3: Out of Box Options for Backing MOS...
-
►
July
(8)
- Links: SharePoint V3: Search: Style Sheets
- Links: SharePoint V3: Search: BDC
- Links: SharePoint V3: Search: Search Center
- Links: SharePoint V3: Search: Planning
- SharePoint V1, V2, V3: SharePoint Web Site Prompt...
- WhitePaper: Microsoft Office Programs and SharePoi...
- SharePoint V3: Configuring the "I Need To..." Web...
- SharePoint V2, V3: Error: Service Unavailable
-
►
June
(12)
- SharePoint V3: Site Images Appear as Red X
- SharePoint V3: Error: Access Denied When Clickin...
- SharePoint V2: How to Configure and View Diagnost...
- Links: SharePoint V3: What every SharePoint admi...
- Links: Project Server 2007: Microsoft TechNet: ...
- Links: SharePoint V3: Microsoft TechNet: Govern...
- SharePoint V3: Error Importing User Profiles
- Links: SharePoint V3: Microsoft TechNet: Plan f...
- SharePoint V2: Adding a New Portal to an SPS 2003...
- SharePoint V3: Configuring the Author Managed Pro...
- SharePoint V2: Error: Upgrade Pre-Scan Error, Or...
- SharePoint V3: MOSS 2007 Search: How to Index Lo...
-
►
October
(11)
Events / Conferences / User Groups
- AIIM Conference
- Boston Area SharePoint User Group
- Boston Azure User Group
- Collaborate
- DevConnections
- DevIntersection
- Enterprise Search Summit
- Microsoft Build
- Microsoft SharePoint Conference
- Microsoft TechEd
- New England ASP.NET Professionals User Group
- New England Oracle Applications User Group
- Oracle Applications User Group (OAUG)
- Oracle OpenWorld
- PeopleSoft Government Contractor Special Interest Group
- PeopleSoft Southern New England Users Group
- Quest International Users Group
- SharePoint Saturday
- SPTechCon
- SQL PASS
- SQL Saturday
- Startup Weekend


