Thursday, January 23, 2014
SharePoint 2013: How to Configure the Excel Service Application using PowerShell
Description
This post describes how to configure the SharePoint Server 2013 Excel Service Application using PowerShell.
Solution
1) Document the Naming Convention
Determine a naming convention for each of the Service Application components. Document the naming convention.
Application Pool: SvcApp_SPServiceApplicationPool_01
Application Pool Service Account: Domain\SvcAccount
Application: SvcApp_SPExcelServiceApplication_01
2) Prepare the Application Pool / Service Account
Example: Subscription Settings Application Pool: SvcApp_SPServiceApplicationPool_01 Application Pool Service Account: Domain\SvcAccount
A) If you are using an existing application pool:
You do not need to create a Service Account nor an Application Pool. Note the names of each.
Verify Application Pool.
Get-SPServiceApplicationPool | Select Name
Get the existing Application Pool.
$SvcAppPool = Get-SPServiceApplicationPool "SvcApp_SPServiceApplicationPool_01"
B) If you are creating a new application pool:
Determine which service account you will use to run the application pool that will be assigned to the. If you need to, create and register a service account to run the Subscription Settings Service Application.
Create the Service Application Pool and register it to the Service Account.
$SvcAppPool = New-SPServiceApplicationPool -Name "SvcApp_SPServiceApplicationPool_01"$AppPool = New-SPServiceApplicationPool -Account (Get-SPManagedAccount Domain\SvcAccount)
Verify Application Pool.
Get-SPServiceApplicationPool | Select Name
Get the existing Application Pool.
$SvcAppPool = Get-SPServiceApplicationPool "SvcApp_SPServiceApplicationPool_01"
3) Open the SharePoint 2013 Management Shell as Administrator.
4) Create the Service Application and assign it to the Application Pool.
$SvcApp = New-SPExcelServiceApplication –ApplicationPool $SvcAppPool -Name "SvcApp_New-SPExcelServiceApplication_01"
Verify Service Application.
Get-SPServiceApplication | Select Name
Verify Service Application Proxy
Get-SPServiceApplicationProxy | Select Name
Notes
The Proxy is created when the New Service Application cmdlet is run. It does not appear that the name of the Proxy may be set or changed independently for this Service Application.
References
Microsoft TechNet (2012). New-SPExcelServiceApplication. Retrieved January 22, 2014 from http://technet.microsoft.com/en-us/library/ff607809.aspx.
Microsoft TechNet (2012). Service application cmdlets in SharePoint 2013. Retrieved January 22, 2014 from http://technet.microsoft.com/en-us/library/ee906561.aspx.
Microsoft TechNet (2012). SharePoint 2013 - Service Applications. Retrieved January 22, 2014 from http://social.technet.microsoft.com/wiki/contents/articles/12512.sharepoint-2013-service-applications.aspx.
Wednesday, January 22, 2014
SharePoint 2013: How to Configure the Access Service Application using PowerShell
Description
This post describes how to configure the SharePoint Server 2013 Access Service Application using PowerShell.
Solution
1) Document the Naming Convention
Determine a naming convention for each of the Service Application components. Document the naming convention.
Application Pool: SvcApp_SPServiceApplicationPool_01
Application Pool Service Account: Domain\SvcAccount
Application: SvcApp_SPAccessServiceApplication_01
2) Prepare the Application Pool / Service Account
Example: Subscription Settings Application Pool: SvcApp_SPServiceApplicationPool_01 Application Pool Service Account: Domain\SvcAccount
A) If you are using an existing application pool:
You do not need to create a Service Account nor an Application Pool. Note the names of each.
Verify Application Pool.
Get-SPServiceApplicationPool | Select Name
Get the existing Application Pool.
$SvcAppPool = Get-SPServiceApplicationPool "SvcApp_SPServiceApplicationPool_01"
B) If you are creating a new application pool:
Determine which service account you will use to run the application pool that will be assigned to the. If you need to, create and register a service account to run the Subscription Settings Service Application.
Create the Service Application Pool and register it to the Service Account.
$SvcAppPool = New-SPServiceApplicationPool -Name "SvcApp_SPServiceApplicationPool_01"$AppPool = New-SPServiceApplicationPool -Account (Get-SPManagedAccount Domain\SvcAccount)
Verify Application Pool.
Get-SPServiceApplicationPool | Select Name
Get the existing Application Pool.
$SvcAppPool = Get-SPServiceApplicationPool "SvcApp_SPServiceApplicationPool_01"
3) Open the SharePoint 2013 Management Shell as Administrator.
4) Create the Service Application and assign it to the Application Pool.
$SvcApp = New-SPAccessServiceApplication –ApplicationPool $SvcAppPool -Name "SvcApp_SPAccessServiceApplication_01"
Verify Service Application.
Get-SPServiceApplication | Select Name
Verify Service Application Proxy
Get-SPServiceApplicationProxy | Select Name
Notes
The Proxy is created when the New Service Application cmdlet is run. It does not appear that the name of the Proxy may be set or changed independently for this Service Application.
References
Microsoft TechNet (2012). New-SPAccessServiceApplication. Retrieved January 22, 2014 from http://technet.microsoft.com/en-us/library/ff607785.aspx.
Microsoft TechNet (2012). Service application cmdlets in SharePoint 2013. Retrieved January 22, 2014 from http://technet.microsoft.com/en-us/library/ee906561.aspx.
Microsoft TechNet (2012). SharePoint 2013 - Service Applications. Retrieved January 22, 2014 from http://social.technet.microsoft.com/wiki/contents/articles/12512.sharepoint-2013-service-applications.aspx.
SharePoint 2013: How to Configure the Metadata Service Application using PowerShell
Description
This post describes how to configure the SharePoint Server 2013 Metadata Service Application using PowerShell.
Solution
1) Document the Naming Convention
Determine a naming convention for each of the Service Application components. Document the naming convention.
Application Pool: SvcApp_SPServiceApplicationPool_01
Application Pool Service Account: Domain\SvcAccount
Application: SvcApp_SPMetadataServiceApplication_01
Proxy: SvcApp_SPMetadataServiceApplication_01_Proxy_01
Database: SvcApp_SPMetadataServiceApplication_01_DB_01
2) Prepare the Application Pool / Service Account
Example: Subscription Settings Application Pool: SvcApp_SPServiceApplicationPool_01 Application Pool Service Account: Domain\SvcAccount
A) If you are using an existing application pool:
You do not need to create a Service Account nor an Application Pool. Note the names of each.
Verify Application Pool.
Get-SPServiceApplicationPool | Select Name
Get the existing Application Pool.
$SvcAppPool = Get-SPServiceApplicationPool "SvcApp_SPServiceApplicationPool_01"
B) If you are creating a new application pool:
Determine which service account you will use to run the application pool that will be assigned to the. If you need to, create and register a service account to run the Subscription Settings Service Application.
Create the Service Application Pool and register it to the Service Account.
$SvcAppPool = New-SPServiceApplicationPool -Name "SvcApp_SPServiceApplicationPool_01"$AppPool = New-SPServiceApplicationPool -Account (Get-SPManagedAccount Domain\SvcAccount)
Verify Application Pool.
Get-SPServiceApplicationPool | Select Name
Get the existing Application Pool.
$SvcAppPool = Get-SPServiceApplicationPool "SvcApp_SPServiceApplicationPool_01"
3) Open the SharePoint 2013 Management Shell as Administrator.
4) Create the Service Application and assign it to the Application Pool.
$SvcApp = New-SPMetadataServiceApplication –ApplicationPool $SvcAppPool -Name "SvcApp_SPMetadataServiceApplication_01" -DatabaseName "SvcApp_SPMetadataServiceApplication_01_DB_01"
Verify Service Application.
Get-SPServiceApplication | Select Name
5) Create the Service Application Proxy and assign it to the Service Application.
$SvcAppProxy = New-SPMetadataServiceApplicationProxy -Name "SvcApp_SPMetadataServiceApplication_01_Proxy_01" -ServiceApplication $SvcApp
Verify Service Application Proxy
Get-SPServiceApplicationProxy | Select Name
References
Microsoft TechNet (2012). New-SPMetadataServiceApplication. Retrieved January 22, 2014 from http://technet.microsoft.com/en-us/library/ff607557.aspx.
Microsoft TechNet (2012). New-SPMetadataServiceApplicationProxy. Retrieved January 22, 2014 from http://technet.microsoft.com/en-us/library/ff608097.aspx.
Microsoft TechNet (2012). Service application cmdlets in SharePoint 2013. Retrieved January 22, 2014 from http://technet.microsoft.com/en-us/library/ee906561.aspx.
Microsoft TechNet (2012). SharePoint 2013 - Service Applications. Retrieved January 22, 2014 from http://social.technet.microsoft.com/wiki/contents/articles/12512.sharepoint-2013-service-applications.aspx.
SharePoint 2013: How to Configure the Business Data Catalog Service Application using PowerShell
Description
This post describes how to configure the SharePoint Server 2013 Business Data Catalog Service Application using PowerShell.
Solution
1) Document the Naming Convention
Determine a naming convention for each of the Service Application components. Document the naming convention.
Application Pool: SvcApp_SPServiceApplicationPool_01
Application Pool Service Account: Domain\SvcAccount
Application: SvcApp_SPBusinessDataCatalogServiceApplication_01
Proxy: SvcApp_SPBusinessDataCatalogServiceApplication_01_Proxy_01
Database: SvcApp_SPBusinessDataCatalogServiceApplication_01_DB_01
2) Prepare the Application Pool / Service Account
Example: Subscription Settings Application Pool: SvcApp_SPServiceApplicationPool_01 Application Pool Service Account: Domain\SvcAccount
A) If you are using an existing application pool:
You do not need to create a Service Account nor an Application Pool. Note the names of each.
Verify Application Pool.
Get-SPServiceApplicationPool | Select Name
Get the existing Application Pool.
$SvcAppPool = Get-SPServiceApplicationPool "SvcApp_SPServiceApplicationPool_01"
B) If you are creating a new application pool:
Determine which service account you will use to run the application pool that will be assigned to the. If you need to, create and register a service account to run the Subscription Settings Service Application.
Create the Service Application Pool and register it to the Service Account.
$SvcAppPool = New-SPServiceApplicationPool -Name "SvcApp_SPServiceApplicationPool_01"$AppPool = New-SPServiceApplicationPool -Account (Get-SPManagedAccount Domain\SvcAccount)
Verify Application Pool.
Get-SPServiceApplicationPool | Select Name
Get the existing Application Pool.
$SvcAppPool = Get-SPServiceApplicationPool "SvcApp_SPServiceApplicationPool_01"
3) Open the SharePoint 2013 Management Shell as Administrator.
4) Create the Service Application and assign it to the Application Pool.
$SvcApp = New-SPBusinessDataCatalogServiceApplication –ApplicationPool $SvcAppPool -Name "SvcApp_ SPBusinessDataCatalogServiceApplication _01" -DatabaseName "SvcApp_ SPBusinessDataCatalogServiceApplication _01_DB_01"
Verify Service Application.
Get-SPServiceApplication | Select Name
5) Create the Service Application Proxy and assign it to the Service Application.
$SvcAppProxy = New-SPBusinessDataCatalogServiceApplicationProxy -Name "SvcApp_SPBusinessDataCatalogServiceApplication_01_Proxy_01" -ServiceApplication $SvcApp
Verify Service Application Proxy.
PS C:\ Get-SPServiceApplicationProxy | Select Name
References
Microsoft TechNet (2012). New-SPBusinessDataCatalogServiceApplication. Retrieved January 22, 2014 from http://technet.microsoft.com/en-us/library/ff607899.aspx.
Microsoft TechNet (2012). New-SPBusinessDataCatalogServiceApplicationProxy. Retrieved January 22, 2014 from http://technet.microsoft.com/en-us/library/ff607952.aspx.
Microsoft TechNet (2012). Service application cmdlets in SharePoint 2013. Retrieved January 22, 2014 from http://technet.microsoft.com/en-us/library/ee906561.aspx.
Microsoft TechNet (2012). SharePoint 2013 - Service Applications. Retrieved January 22, 2014 from http://social.technet.microsoft.com/wiki/contents/articles/12512.sharepoint-2013-service-applications.aspx.
SharePoint 2013: How to Configure the Usage Service Application using PowerShell
Last Updated March 28, 2014
Description
This post describes how to configure the SharePoint Server 2013 Usage Service Application using PowerShell.
Solution
1) Plan and Document the Naming Convention.
Document a naming convention for each of the Service Application components.
Example:
Application Pool Service Account: Domain\SvcAccount (this should already be created)
Application Pool: SvcApp_SPServiceApplicationPool_02 (this should already be created)
Service Application: SvcApp_SPUsageApplication_01
Service Application Database: SvcApp_SPUsageApplication_01_DB_01
Service Application Proxy: SvcApp_SPUsageApplication_01_Proxy_01
2) Open the SharePoint 2013 Management Shell.
3) Verify the Name of the Application Pool.
Get-SPServiceApplicationPool | Select Name
4) Get the existing Application Pool.
$SvcAppPool02 = Get-SPServiceApplicationPool "SvcApp_SPServiceApplicationPool_02"
5) Create the Service Application and assign it to the Application Pool.
$SvcApp = New-SPUsageApplication –Name “SvcApp_SPUsageApplication_01” -DatabaseName "SvcApp_SPUsageApplication_01_DB_01" –DatabaseServer “SQL Alias Name”
The Proxy is created automatically when the New Service Application cmdlet is run. It does not appear that the name of the Proxy may be set or changed independently for this Service Application at the time of creation.
6) Verify Service Application.
Get-SPServiceApplication | Select Name
7) Verify Service Application Proxy.
Get-SPServiceApplicationProxy | Select Name
8) Get the Usage and Health Data Collection Proxy.
$SvcAppProxy = Get-SPServiceApplicationProxy | Where {$_.TypeName -like “Usage and Health*”}
9) Start the Usage and Health Data Collection Proxy.
$SvcAppProxy.Provision()
References
Microsoft TechNet (2012). New-SPUsageApplication. Retrieved January 22, 2014 from http://technet.microsoft.com/en-us/library/ff607699.aspx.
Microsoft TechNet (2012). Service application cmdlets in SharePoint 2013. Retrieved January 22, 2014 from http://technet.microsoft.com/en-us/library/ee906561.aspx.
Microsoft TechNet (2012). SharePoint 2013 - Service Applications. Retrieved January 22, 2014 from http://social.technet.microsoft.com/wiki/contents/articles/12512.sharepoint-2013-service-applications.aspx.
Description
This post describes how to configure the SharePoint Server 2013 Usage Service Application using PowerShell.
Solution
1) Plan and Document the Naming Convention.
Document a naming convention for each of the Service Application components.
Example:
Application Pool Service Account: Domain\SvcAccount (this should already be created)
Application Pool: SvcApp_SPServiceApplicationPool_02 (this should already be created)
Service Application: SvcApp_SPUsageApplication_01
Service Application Database: SvcApp_SPUsageApplication_01_DB_01
Service Application Proxy: SvcApp_SPUsageApplication_01_Proxy_01
2) Open the SharePoint 2013 Management Shell.
3) Verify the Name of the Application Pool.
Get-SPServiceApplicationPool | Select Name
4) Get the existing Application Pool.
$SvcAppPool02 = Get-SPServiceApplicationPool "SvcApp_SPServiceApplicationPool_02"
5) Create the Service Application and assign it to the Application Pool.
$SvcApp = New-SPUsageApplication –Name “SvcApp_SPUsageApplication_01” -DatabaseName "SvcApp_SPUsageApplication_01_DB_01" –DatabaseServer “SQL Alias Name”
The Proxy is created automatically when the New Service Application cmdlet is run. It does not appear that the name of the Proxy may be set or changed independently for this Service Application at the time of creation.
6) Verify Service Application.
Get-SPServiceApplication | Select Name
7) Verify Service Application Proxy.
Get-SPServiceApplicationProxy | Select Name
8) Get the Usage and Health Data Collection Proxy.
$SvcAppProxy = Get-SPServiceApplicationProxy | Where {$_.TypeName -like “Usage and Health*”}
9) Start the Usage and Health Data Collection Proxy.
$SvcAppProxy.Provision()
Microsoft TechNet (2012). New-SPUsageApplication. Retrieved January 22, 2014 from http://technet.microsoft.com/en-us/library/ff607699.aspx.
Microsoft TechNet (2012). Service application cmdlets in SharePoint 2013. Retrieved January 22, 2014 from http://technet.microsoft.com/en-us/library/ee906561.aspx.
Microsoft TechNet (2012). SharePoint 2013 - Service Applications. Retrieved January 22, 2014 from http://social.technet.microsoft.com/wiki/contents/articles/12512.sharepoint-2013-service-applications.aspx.
SharePoint 2013: How to Configure Secure Store Service Application using PowerShell
Last Updated March 28, 2014
Get-SPServiceInstance | Where {$_.TypeName -like "Secure Store Service"}
Use the Get-SPServiceInstance cmdlet to get the ID Numbers of the SPServiceInstance(s). Once you have the ID Numbers, use the numbers to start each SPServiceInstance. Once fully started, the status of each will show as "Online".
Example:
Start-SPServiceInstance 67877d63-bff4-4521-867a-ef4979ba07ce
Start-SPServiceInstance IDNumber1
Start-SPServiceInstance IDNumber2
References
Farid, S. (2011). Configure Secure Store Service using PowerShell. Retrieved January 22, 2014 from http://samirfarid.wordpress.com/2011/11/28/configure-secure-store-service-using-powershell.
Microsoft TechNet (2014). Configure the Secure Store Service in SharePoint 2013. Retrieved January 22, 2014 from http://technet.microsoft.com/en-us/library/ee806866.aspx.
Microsoft TechNet (2014). New-SPSecureStoreServiceApplication. Retrieved January 22, 2014 from http://technet.microsoft.com/en-us/library/ff608083.aspx.
Microsoft TechNet (2014). New-SPSecureStoreServiceApplicationProxy. Retrieved January 22, 2014 from http://technet.microsoft.com/en-us/library/ff607856.aspx.
Microsoft TechNet (2014). Secure Store Service cmdlets in SharePoint 2013. Retrieved January 22, 2014 from http://technet.microsoft.com/en-us/library/ee906549.aspx.
Microsoft TechNet (2014). Service application cmdlets in SharePoint 2013. Retrieved January 22, 2014 from http://technet.microsoft.com/en-us/library/ee906561.aspx.
Microsoft TechNet (2014). SharePoint 2013 - Service Applications. Retrieved January 22, 2014 from http://social.technet.microsoft.com/wiki/contents/articles/12512.sharepoint-2013-service-applications.aspx.
Description
This post describes how to configure the SharePoint Server 2013 Secure Store Service Application using PowerShell.
This post describes how to configure the SharePoint Server 2013 Secure Store Service Application using PowerShell.
Solution
1) Document the Naming Convention
Determine a naming convention for each of the Secure Store Service Application components. Document the naming convention.
Example:
Application Pool Service Account: Domain\SvcAccount (this should already be created)
Application Pool: SvcApp_SPServiceApplicationPool_02 (this should already be created)
Service Application: SvcApp_SPSecureStoreServiceApplication_01
Database: SvcApp_SPSecureStoreServiceApplication_01_DB_01
Service Application Proxy: SvcApp_SPSecureStoreServiceApplication_01_Proxy_01
2) Open the SharePoint 2013 Management Shell as Administrator.
3) Start the Secure Store Service.Get-SPServiceInstance | Where {$_.TypeName -like "Secure Store Service"}
Use the Get-SPServiceInstance cmdlet to get the ID Numbers of the SPServiceInstance(s). Once you have the ID Numbers, use the numbers to start each SPServiceInstance. Once fully started, the status of each will show as "Online".
Example:
Start-SPServiceInstance 67877d63-bff4-4521-867a-ef4979ba07ce
Start-SPServiceInstance IDNumber1
Start-SPServiceInstance IDNumber2
3) Verify the Name of the Application Pool.
Get-SPServiceApplicationPool | Select Name
4) Set the Service Application Pool in a variable.
$SvcAppPool02 = Get-SPServiceApplicationPool "SvcApp_SPServiceApplicationPool_02"
5) Create the Secure Store Service Application. Specify the Application Pool, the AuditingEnabled setting, the Service Application Name, the Database Name, and the Database Server Name.
$SvcApp = New-SPSecureStoreServiceApplication -ApplicationPool
$SvcAppPool –AuditingEnabled:$false -Name
"SvcApp_SPSecureStoreServiceApplication_01" -DatabaseName
"SvcApp_SPSecureStoreServiceApplication_01_DB_01" -DatabaseServer "SQL
Server Alias"
6) Verify the Service Application.
Get-SPServiceApplication | Select Name
6) Verify the Service Application.
Get-SPServiceApplication | Select Name
7) Create the Service Application Proxy and assign it to the Service
Application.
$SvcAppProxy = New-SPSecureStoreServiceApplicationProxy -Name "SvcApp_SPSecureStoreServiceApplication_01_Proxy_01" -ServiceApplication $SvcApp
8) Verify Service Application Proxy.
Get-SPServiceApplicationProxy | Select Name
$SvcAppProxy = New-SPSecureStoreServiceApplicationProxy -Name "SvcApp_SPSecureStoreServiceApplication_01_Proxy_01" -ServiceApplication $SvcApp
8) Verify Service Application Proxy.
Get-SPServiceApplicationProxy | Select Name
References
Farid, S. (2011). Configure Secure Store Service using PowerShell. Retrieved January 22, 2014 from http://samirfarid.wordpress.com/2011/11/28/configure-secure-store-service-using-powershell.
Microsoft TechNet (2014). Configure the Secure Store Service in SharePoint 2013. Retrieved January 22, 2014 from http://technet.microsoft.com/en-us/library/ee806866.aspx.
Microsoft TechNet (2014). New-SPSecureStoreServiceApplication. Retrieved January 22, 2014 from http://technet.microsoft.com/en-us/library/ff608083.aspx.
Microsoft TechNet (2014). New-SPSecureStoreServiceApplicationProxy. Retrieved January 22, 2014 from http://technet.microsoft.com/en-us/library/ff607856.aspx.
Microsoft TechNet (2014). Secure Store Service cmdlets in SharePoint 2013. Retrieved January 22, 2014 from http://technet.microsoft.com/en-us/library/ee906549.aspx.
Microsoft TechNet (2014). Service application cmdlets in SharePoint 2013. Retrieved January 22, 2014 from http://technet.microsoft.com/en-us/library/ee906561.aspx.
Microsoft TechNet (2014). SharePoint 2013 - Service Applications. Retrieved January 22, 2014 from http://social.technet.microsoft.com/wiki/contents/articles/12512.sharepoint-2013-service-applications.aspx.
Wednesday, January 08, 2014
SQL Server 2012: SELECT Machine Name, Server Name, Edition, Product Level, Product Version, Licence Type
Description
This post shows how to SELECT property information for a SQL Server.
Solution
The SELECT statement below retrieves Machine Name, Server Name, Edition, Product Level, Product Version, and License Type.
SELECT
SERVERPROPERTY('MACHINENAME') as [Machine Name],
SERVERPROPERTY('SERVERNAME') as [Server Name],
SERVERPROPERTY('EDITION') as [Edition],
SERVERPROPERTY('PRODUCTLEVEL') as [Product Level] ,
SERVERPROPERTY('PRODUCTVERSION') as [Product Version],
SERVERPROPERTY('LICENSETYPE') as [License Type]
The results of the query are shown below.

References
MSDN (2014). SERVERPROPERTY (Transact-SQL). Retrieved January 8, 2014 from http://msdn.microsoft.com/en-us/library/ms174396.aspx
Tuesday, January 07, 2014
How to Associate SQL Server Login with Existing Database User
Description
Sometimes a SQL Server Login is created and corresponding Database User is created at the same time. However, sometimes the Database User is not associated with a SQL Server Login and needs to be. For example, this could happen during an database environment migration or if when the Active Directory User Account associated with SQL Server Login is deleted and a new one is created.
Solution
The steps below can be used to lookup database principals and then associate a Login with a User.
1. Run the SELECT query below to view all database principals, including:
- DATABASE_ROLE
- SQL_USER
- WINDOWS_USER
SELECT * FROM sys.database_principals
2. Run ALTER USER query below to alter the database user and associate a login with it. In the example below, a Windows Login is being associated with a database user.
ALTER USER "DOMAIN\Username"
WITH
LOGIN = "DOMAIN\Username"
(Microsoft TechNet, 2014)
References
Bertrand, A. (November, 2013). Script to Set the SQL Server Database Default Schema For All Users. Retrieved January 7, 2014 from
http://www.mssqltips.com/sqlservertip/3098/script-to-set-the-sql-server-database-default-schema-for-all-users/
Microsoft TechNet (2014). ALTER USER (Transact-SQL). Retrieved January 7, 2014 from http://technet.microsoft.com/en-us/library/ms176060.aspx
Tharaka MTR (May, 2013). How to Fix Orphaned SQL Users. Retrieved January 7, 2014 from http://www.codeproject.com/Articles/594134/How-to-Fix-Orphaned-SQL-Users
Tuesday, December 17, 2013
SQL Server, Configure Database Mail
Description
This post shows how to configure SQL Server Database Mail in SQL Server 2012.
Solution
Open SQL Server Management Studio. Expand Management. Right-click on Database Mail and select Configure Database Mail.

Click Next on the Database Mail Configuration Wizard Welcome Screen.

Choose "Set up Database Mail" and click Next.

Database Mail is disabled by default. When prompted, click "Yes" to enable the Database Mail feature.

Create a new Database Mail Account.

Complete the "New Profile" screen and click Next.

Mark the Profile "Public" and click Next.

Complete the "Configure System Parameters" screen and click Next.

Click Finish to complete the Database Mail Configuration Wizard.

Verify all configurations are successful and click Close.

References
Microsoft TechNet (2008). Database Mail. Retrieved December 17, 2013 from http://technet.microsoft.com/en-us/library/ms175887%28v=sql.105%29.aspx
Tuesday, December 03, 2013
Chart of PMBOK(R) Fifth Edition Knowledge Areas and Process Groups
Description
This chart illustrates the Project Management Knowledge Areas and Process Groups as defined by the Project Management Institute (PMI.org) in the PMBOK(R) Guide Fifth Edition which was published in January, 2013.

References
Project Management Institute (January, 2013). A Guide to the Project Management Body of Knowledge (PMBOK Guide) Fifth Edition. Newtown Square, PA: Project Management Institute.
Monday, December 02, 2013
PowerShell, New-AdUser Cmdlet for Creating SQL/SharePoint Service Accounts
Description
I think the degree to which you seek to automate various administrative tasks during a SQL Server / SharePoint deployment depends on a variety of things; of which your immediate time and value of reuse-ability in time invested are certainly at the top of the list. I recently needed to create about ten AD service accounts for a new deployment. While I could have fully automated the process with a PowerShell script that would read from an Excel file (Microsoft Script Center, 2013), all I really wanted to do was simplify the process of creating AD users, inline, using PowerShell.
Solution
The New-ADUser cmdlet has several parameters. The example below creates one AD User Account called SvcSampleUser01 with parameters values that make sense for my purposes. Of course, each environment will differ and so this example may need to be modified accordingly.
New-ADUser –SamAccountName “SvcSampleUser01” -UserPrincipalName "SvcSampleUser01@domain.com” -GivenName “” -Surname “” -Name "SvcSampleUser01" -DisplayName “SvcSampleUser01” -Description "Service Account, SharePoint Farm 01, SharePoint Sample Service Account." -Enabled $true -PasswordNeverExpires $true -CannotChangePassword $true -ChangePasswordAtLogon $false -path “OU=LowOU, OU=MidOU, OU=HighOU, DC=DOMAINNAME, DC=com” -AccountPassword (Read-Host -AsSecureString "Specify Account Password, Enter")
One thing to take note of is the -path parameter. Most of the examples on the Web only have a single OU listed. In cases where the target OU is nested, then you list the OU's sequentially from the lowest to the highest as shown in the example.
Also, note that this cmldet will prompt for the password to be typed in.
Using this cmdlet inline in a PowerShell window will be faster than using the AD user interface. However, this may be slower than using a fully automated approach with an Excel input, depending on how many accounts need to be created.
References
Microsoft Script Center (2013). PowerShell: Create Active Directory Users Based On Excel Input. Retrieved December 2, 2013 from http://gallery.technet.microsoft.com/scriptcenter/PowerShell-Create-Active-7e6a3978.
Microsoft TechNet (2013). Active Directory Cmdlets in Windows PowerShell. Retrieved December 2, 2013 from http://technet.microsoft.com/en-us/library/ee617195.aspx.
Microsoft TechNet (2013). New-ADUser. Retrieved December 2, 2013 from http://technet.microsoft.com/en-us/library/ee617253.aspx.
Friday, November 29, 2013
SQL Server Reporting Services (SSRS) Report Pagination InteractiveSize
Description
When viewing a deployed, SQL Server Reporting Services (SSRS) report, the default pagination does not provide a pleasant user experience because viewing more than a handful of rows of report data requires that the user page right and page left.


Solution
To display all rows of data on the first page of the SSRS report, set InteractiveSize properties (Width and Height) to 0.

After updating the properties, Save the report, then Deploy the report.

Refresh the report in the browser and now all of the report data will display on the page. If viewing the report in SharePoint using a Report Viewer Web Part, then you may need to adjust the Height and Width of the Report Viewer Web Part to eliminate any scroll bars that appear as a result of the data being displayed on one page.

References
Microsoft TechNet (2013). Controlling Report Pagination. Retrieved November 29, 2013 from http://technet.microsoft.com/en-us/library/ms156282%28v=sql.90%29.aspx
Friday, August 30, 2013
SPS NH: Search Driven Design Patterns for SharePoint 2013
Event:
SharePoint Saturday NH
Saturday, September 21, 2013
Session Title:
Search Driven Design Patterns for SharePoint 2013
Abstract:
First, we will discuss SharePoint portal design flaws, related deficiencies, and challenges that exist with SharePoint in the enterprise. We will discuss the Search platform and redefine what it means to us and how we leverage it. We will take a tour of a Search Driven portal and review the configuration of Managed Properties, Result Sources, Query Rules, Search Results Web Parts, Display Templates, Search Boxes, and Search Pages. Next, we will construct Search Driven components using creative techniques and reflect on the benefits of the overall approach that we followed, comparing and contrasting with other design patterns. Finally, we will take a step back and discuss the future of Search and how to align SharePoint Search with the overarching Enterprise Architecture strategy.
This session provides practical guidance and best practices for SharePoint 2013 and SharePoint 2010 portal design, content management design, and search configuration based on real world lessons learned. The demonstrations and technical deep dives showcase Search Driven Design Patterns in motion while providing instructions for how to build a Search Driven portal.
Slides:
 Search Driven Design Patterns for SharePoint 2013.pdf
SharePoint Saturday NH
Saturday, September 21, 2013
Session Title:
Search Driven Design Patterns for SharePoint 2013
Abstract:
First, we will discuss SharePoint portal design flaws, related deficiencies, and challenges that exist with SharePoint in the enterprise. We will discuss the Search platform and redefine what it means to us and how we leverage it. We will take a tour of a Search Driven portal and review the configuration of Managed Properties, Result Sources, Query Rules, Search Results Web Parts, Display Templates, Search Boxes, and Search Pages. Next, we will construct Search Driven components using creative techniques and reflect on the benefits of the overall approach that we followed, comparing and contrasting with other design patterns. Finally, we will take a step back and discuss the future of Search and how to align SharePoint Search with the overarching Enterprise Architecture strategy.
This session provides practical guidance and best practices for SharePoint 2013 and SharePoint 2010 portal design, content management design, and search configuration based on real world lessons learned. The demonstrations and technical deep dives showcase Search Driven Design Patterns in motion while providing instructions for how to build a Search Driven portal.
Slides:
Saturday, August 17, 2013
Windows Server 2012, Windows 8, Product Key and Activate
Description
The "Change product key" link is not visible in Windows Server 2012 or Windows Server 2008 and the license is not activated.
Solution
Enter a Product Key and Activate Windows.
1) All Apps, Run, slui.exe 0x3, click OK
2) Type Product Key, click Activate
Reference
Microsoft Support (2013). "Change product key" link is not available in Windows 8 or in Windows Server 2012. Retrieved August 17, 2013 from http://support.microsoft.com/kb/2750773
TechNet (2013). Slmgr.vbs Options. Retrieved August 17, 2013 from http://technet.microsoft.com/en-us/library/ff793433.aspx
Sunday, August 11, 2013
Error: SQL Server: Unable to Shrink Transaction Log, "Could not locate file for database..."
Description
You attempt to shrink a transaction log file associated with a SQL Server database, but you receive in error:
"Could not locate file 'Transaction Log Name' for database
'Database Name' in sys.database_files. The file either does not exist, or was dropped."
Solution
1) Run SP_HelpFile to get the correct name of the transaction log file.
USE Database Name
EXEC sp_helpfile
(TechNet, 2013)
This will return the following information about the database files, including the associated transation log(s): Name, FileId, FileName, FileGroup, Size, MaxSize, Growth, Usage
2) Run the Transact-SQL statement again, using the correct Transaction Log Name. You can find this in the Name column of the SP_HelpFile query results set.
USE [Database Name]
GO
ALTER DATABASE Database Name SET RECOVERY SIMPLE WITH NO_WAIT
DBCC SHRINKFILE(Transaction Log Name, 1)
ALTER DATABASE Database Name SET RECOVERY FULL WITH NO_WAIT
GO
(TechNet, 2013)
3) Verify that there are configured, scheduled, and enabled SQL Server Backup jobs in place for:
a) Full Database Backup
b) Transaction Log Backup *Important for Full Recovery Model*
Reference
TechNet (2013). Backup Under the Full Recovery Model. Retrieved August 11, 2013 from http://technet.microsoft.com/en-us/library/ms190217%28v=sql.105%29.aspx
TechNet (2013). DBCC SHRINKFILE (Transact-SQL). Retrieved August 11, 2013 from http://technet.microsoft.com/en-us/library/ms189493.aspx
TechNet (2013). Recovery Models and Transaction Log Management. Retrieved August 11, 2013 from http://technet.microsoft.com/en-us/library/ms366344%28v=sql.105%29.aspx
TechNet (2013). sp_helpfile. Retrieved August 11, 2013 from http://technet.microsoft.com/en-us/library/aa933456%28v=sql.80%29.aspx
Monday, July 29, 2013
Installing .NET framework (Netfx3) on Windows Server 2012 using PowerShell
Description
The purpose of this post is to provide instructions for installing .NET framework (NetFx3) on Windows Server 2012 using PowerShell.
.NET Framework is a requirement for SQL Server 2012. If this has not been installed prior to a SQL Server 2012 installation, then an error message will surface during the installation process. It is recommended to run the PowerShell command for installing Netfx3 prior to beginning the SQL Server installation.
Solution
1. Make the Windows Server 2012 media (DVD) available. For this example, I mounted a DVD drive on drive letter Z.
2. Open Windows PowerShell as an Administrator.
3. Run the following PowerShell command, replacing the source details with those specific to your environment.
PS C:\Windows\system32> dism /online /enable-feature /all /featurename:NetFx3 /source:z:\sources\sxs

Reference
Microsoft TechNet (February, 2012). DISM - Deployment Image Servicing and Management Technical Reference. Retrieved July 29, 2013 from http://technet.microsoft.com/en-us/library/hh824821.aspx
Microsoft TechNet (February, 2012). Use DISM in Windows PowerShell. Retrieved July 29, 2013 from http://technet.microsoft.com/en-us/library/hh825010.aspx
Verbeeck, K. (April, 2013). Error while enabling Windows Feature: Netfx3. Retrieved July 29, 2013 from http://www.sqlservercentral.com/blogs/koen-verbeeck/2013/04/29/error-while-enabling-windows-feature-netfx3
Thursday, July 18, 2013
SQL Server 2012: Find SQL Server Collation
Description
How to retrieve collation information for SQL Server 2012.
Solution
During the set up of SQL Server 2012, the default collations are as follows (as shown below):
Database Engine: SQL_Latin1_General_CP1_CI_AS
Analysis Services: Latin1_General_CI_AS
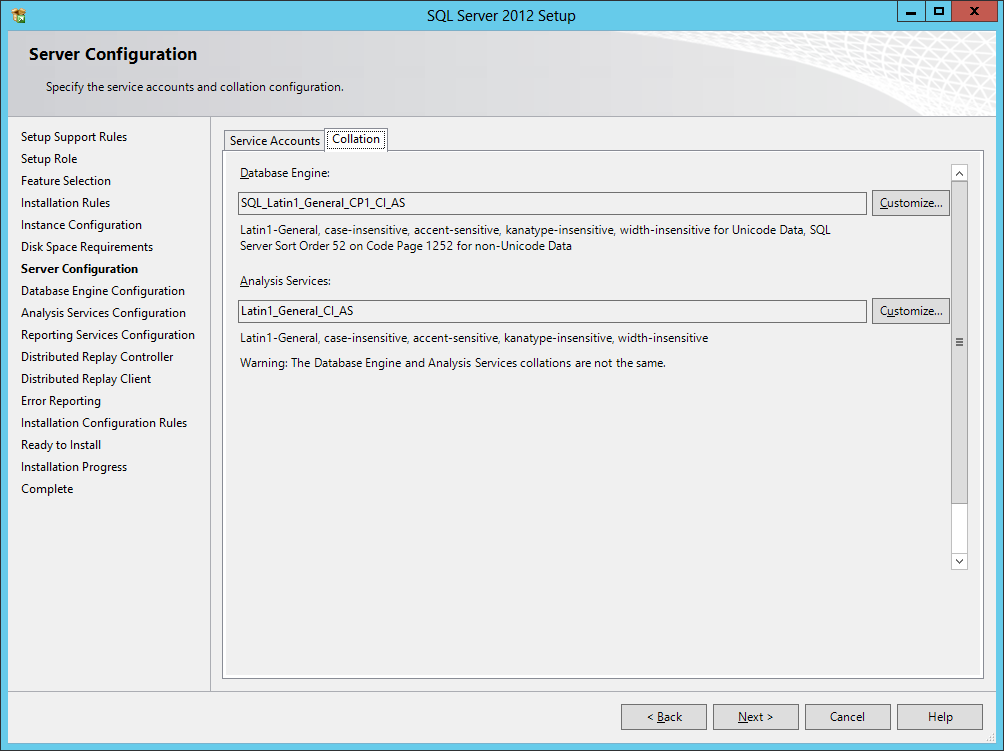
To retrieve the collation of the Database Engine for an existing SQL Server instance:
SELECT CONVERT (varchar, SERVERPROPERTY('collation'));
To retrieve the collation of databases attached to the SQL Server instance:
SELECT name, collation_name FROM sys.databases;
(MSDN, 2012)
Reference
MSDN (2012). View Collation Information. Retrieved July 18, 2013 from http://msdn.microsoft.com/en-us/library/hh230914.aspx
Wednesday, July 03, 2013
Issue: Windows Server 2012, JavaScript Blocked on Internet Explorer
Description
On a Windows Server 2012 system, JavaScript is being blocked in Internet Explorer.

Solution
1. Open Server Manager.
2. Click "Local Server"

3. In the Properties section, locate "IE Enhanced Security Configuration." It is currently set to "On." Click "On" to open a dialog window.
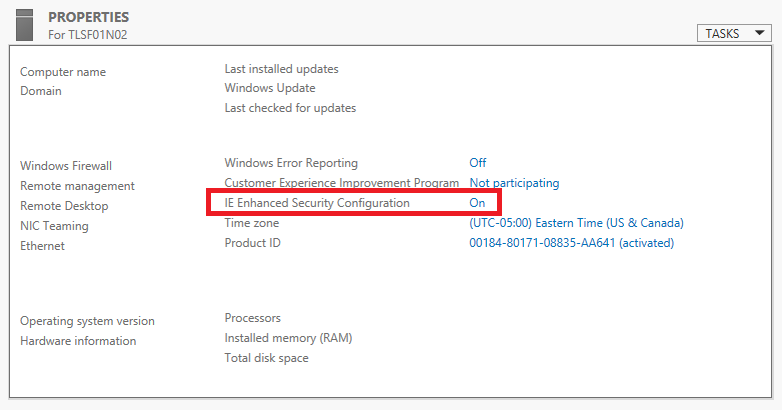
4. Change the "Internet Explorer Enhanced Security Configuration" settings to Off as needed. Click OK and close Server Manager.

Tuesday, June 11, 2013
SPS NYC: Search Driven Design Patterns for SharePoint 2013
Event:
SharePoint Saturday NYC
Saturday, July 27, 2013
Session Title:
Search Driven Design Patterns for SharePoint 2013
Abstract:
First, we will step back and examine some SharePoint related deficiencies, common portal design flaws, and challenges that exist in the enterprise. Next, we will align ourselves with an overarching Enterprise Architecture strategy and redefine the role of SharePoint Search in the organization. From there, we will design a SharePoint 2013 portal that is optimized and ready for Search Driven design patterns. Finally, we will construct Search Driven components using creative techniques and reflect on the benefits of the overall approach that we followed.
Slides:
Search Driven Design Patterns for SharePoint 2013.pdf
SharePoint Saturday NYC
Saturday, July 27, 2013
Session Title:
Search Driven Design Patterns for SharePoint 2013
Abstract:
First, we will step back and examine some SharePoint related deficiencies, common portal design flaws, and challenges that exist in the enterprise. Next, we will align ourselves with an overarching Enterprise Architecture strategy and redefine the role of SharePoint Search in the organization. From there, we will design a SharePoint 2013 portal that is optimized and ready for Search Driven design patterns. Finally, we will construct Search Driven components using creative techniques and reflect on the benefits of the overall approach that we followed.
Slides:
Sunday, March 10, 2013
Blindly Diagnosing a RAM Issue affecting SharePoint 2010 W3Wp.exe and SQL Server 2005 Enterprise Edition
I received limited information about an issue. Here are some ideas.
Description
A SharePoint Server 2010 Farm with a SQL Server 2005 Enterprise Edition database server has RAM issues which are affecting affecting both the Web front end (w3wp.exe) and SQL Server.
Would be Helpful to Know
Description
A SharePoint Server 2010 Farm with a SQL Server 2005 Enterprise Edition database server has RAM issues which are affecting affecting both the Web front end (w3wp.exe) and SQL Server.
Would be Helpful to Know
Is
it 32-bit or 64-bit? How much physical RAM is assigned to each server role?
What version and patch level is the OS?
What version and patch level is SQL Server? How is SharePoint being
used? How many users? Are there
custom Web parts? Custom Web pages? What are the SQL Server performance
counters reading? When does a memory spike occur? How long does it
last? When did it start? What recently changed in the
environment? Are the systems physical or virtual? What is the
server farm topology?
Possible Causes
Need
a Service Pack/Patch for OS: self-explanatory, but need the current
information to know if this is a possibility.
Antivirus: Investigate
antivirus software running on the servers.
IIS Forums reported that McAfee Enterprise V8 had a buffer overflow protection feature that
was causing problems with w3wp.exe (IIS Forums, 2008).
Incorrectly
disposed objects: Unmanaged memory can lead to memory problems
(MSDN, 2010).
Scheduled
jobs:
SQL Server maintenance plans, SQL agent jobs (e.g. backups), SharePoint
full or incremental crawl schedules can create noticeable degradation while
running.
On
the SQL Server side of things: Resource bottlenecks, TempDB bottlenecks, or
a slow running user query (less likely in this situation) (MSDN, 2010).
Query the sys.dm_os_memory_clerks and sys.dm_exec_query_memory_grants DMVs to
get an idea how SQL Server is utilizing memory.
Reference
IIS Forums(July, 2008). W3wp.exe memory usage is out of control. Retrieved March 10, 2013 from http://forums.iis.net/t/1150494.aspx
Microsoft TechNet (2005). Troubleshooting Performance Problems in SQL Server 2005. Retrieved March 10, 2013 from http://technet.microsoft.com/library/Cc96654
IIS Forums(July, 2008). W3wp.exe memory usage is out of control. Retrieved March 10, 2013 from http://forums.iis.net/t/1150494.aspx
Microsoft TechNet (2005). Troubleshooting Performance Problems in SQL Server 2005. Retrieved March 10, 2013 from http://technet.microsoft.com/library/Cc96654
MSDN (2010). Disposing Objects. Retrieved March 10, 2013 from http://msdn.microsoft.com/en-us/library/ee557362.aspx
MSDN (2010). SharePoint Dispose Checker Tool. Retrieved March 10, 2013 from http://archive.msdn.microsoft.com/SPDisposeCheck
Subscribe to:
Comments (Atom)

