Home

Thursday, June 28, 2007

SharePoint V3: Site Images Appear as Red X

Description:

After logging into a SharePoint Web Application, the site images show as red x.


Solution:

* IIS Manager > Application Pool Properties for Web Application > Identity
* Select "Configurable" radio button
* For user name and password, type the domain\username and password of a farm service account
* Run IIS Reset


SharePoint V3: Error: Access Denied When Clicking User Profiles and Properties in SSP

Description:

Shared Service Provider > User Profiles and Properties
Error: Access Denied


Solution:

Log into Shared Service Provider web application using an administrator account. In Actions > Site Settings > All Site Settings > Advanced Permissions, add the users to the access list for the site and assign permissions. In Actions > Site Settings > All Site Settings > Site Collection Owners, add the user account as a site collection owner if desired.

Wednesday, June 13, 2007

SharePoint V2: How to Configure and View Diagnostic Logs for Search in SharePoint Portal Server 2003

Configuring:

Central Admin > Component Configuration > Configure Diagnostic Settings


Under Logging Settings, highlight Search Service and click Edit


Modify the logging level (remember to go back afterwards and set it back to avoid using disk space unnecessarily)


Viewing:

Under View Diagnostic Logs, highlight the most recent search log and click View

Thursday, June 07, 2007

Links: SharePoint V3: Microsoft TechNet: Governance Information for SharePoint Server 2007

Microsoft TechNet: Governance Information for SharePoint Server 2007

SharePoint V3: Error Importing User Profiles

Description:

In Microsoft Office SharePoint Server 2007, after initiating a full user profile import, the user profiles fail to import and the crawl log contains the following error:
"The specified domain either does not exist or could not be contacted. (Exception from HRESULT: 0x8007054B)"

Solution:

Adding WINS addresses to the LAN Connection properties corrected this issue.

1.
From the Index server: Control Panel > Network Connections > LAN Connection Properties > WINS tab
Add WINS server addresses

2.
SSP Admin > User Profile and Properties > Import
Perform user profile import
Verify import is successful

Wednesday, June 06, 2007

Links: SharePoint V3: Microsoft TechNet: Plan for performance and capacity (Office SharePoint Server)

Microsoft TechNet: Plan for performance and capacity (Office SharePoint Server)

SharePoint V2: Adding a New Portal to an SPS 2003 Server Farm

Description:

This blog post explains how to add a new portal to a SharePoint Portal Server 2003 farm having two front end web servers.

Solution:

Web Server #1

* From Windows Explorer: Create a directory on a non operating sytem drive to be used for the new IIS web site.
* From IIS Manager: Create a new web site, using the new directory as the home directory. Disable anonymous access.
* From SharePoint Portal Server 2003 Central Administration:
SharePoint Portal Server > Portal Site and Virtual Server Configuration > Create a Portal
Site Name: Give the portal a name, consider using host header or port number in name.
Virtual Server: Select the new IIS web site. Site URL: e.g. http://webserver1:port
Account Name, Email Address

Web Server #2

* From Windows Explorer: Create a directory on a non operating sytem drive to be used for the new IIS web site.
* From IIS Manager: Create a new web site, using the new directory as the home directory. Disable anonymous access.
* From SharePoint Portal Server 2003 Central Administration:

Windows SharePoint Services > Virtual Server Configuration > Extend or Upgrade Virtual Server Provisioning Options > Extend and map to another virtual server Current
Virtual Server: Verify this is set to the web site you want to extend
Server Mapping: Select the virtual server that was created on web server #1 Wait for refresh cache on the other serverse to succeed and click ok.

Tuesday, June 05, 2007

SharePoint V3: Configuring the Author Managed Property

Description:

This blog post explains how to configure the Author managed property so that it may be used effectively in Search within an Office SharePoint Server 2007 environment.

Solution:

SSP Admin > Search Settings > Metadata Property Mappings > Managed Properties > Author

Step 1

Set the "Mappings to crawled properties" radio button to "Include values from a single crawled property based on the order specified." It is common to expose the Author property in search results, so don't "include all values from crawled properties mapped" because your search results will end up with mulitple names listed beside the search result and it will be difficult to distinguish which is really the author.

Step 2

Map the most relevant crawled properties to the Author managed property, and position them in the best possible sequence. Obviously, if authors are truly dilligent about maintaining the Office document Author property within the document itself , then this is best candidate for first position. However, in many organizations, this property is not actively maintained. SharePoint's Created By property isn't always an accurate indicator of who actually created the document, so this one also tends to fail as being a reliable first position candidate. In many cases, the best thing to do is to create a custom Author site column, make it required, and add it to all document content types. Then, map the corresponding crawled property as first position. This ensures that the Author information will be maintained to some degree by people touching the documents.

Once the first position is set, then add and order the subsequent crawled properties.

SharePoint V2: Error: Upgrade Pre-Scan Error, Orphaned Site

Description:

During preparation for an upgrade to Microsoft Office SharePoint Server 2007, after running prescan.exe on a SharePoint Portal Server 2003 environment, the pre-upgrade report lists an error such as the one below.

06/04/2007 16:26:59 Error: Cannot get content database Id for SPSite: http://servername/sites/sitename
06/04/2007 16:26:59 Microsoft.SharePoint.SPException: There is no Web named "/sites/sitename". ---> System.Runtime.InteropServices.COMException (0x81070504): There is no Web named "/sites/sitename". at Microsoft.SharePoint.Library.SPRequestInternalClass.OpenSite(String bstrUrl, Boolean bGetUrlOnly, String& pbstrServerRelativeUrl, Guid& pgSiteId, Int32& pOwnerID, Int32& pSecondaryContactID, DateTime& pdtLastContentChange, DateTime& pdtLastSecurityChange) at Microsoft.SharePoint.Library.a.a(String A_0, Boolean A_1, String& A_2, Guid& A_3, Int32& A_4, Int32& A_5, DateTime& A_6, DateTime& A_7) --- End of inner exception stack trace --- at Microsoft.SharePoint.Library.a.a(String A_0, Boolean A_1, String& A_2, Guid& A_3, Int32& A_4, Int32& A_5, DateTime& A_6, DateTime& A_7) at Microsoft.SharePoint.SPSite.c() at Microsoft.SharePoint.SPSite.get_ID() at Microsoft.SharePoint.PreupgradeReport.Scan.GetContentDBBySite(SPSite site, SPVirtualServer vs)

Solution:

Windows SharePoint Services 2.0 and SharePoint Portal Server 2003 each have their own approach to cleaning up orphaned records. The KB articles below provide information on related hotfixes and explain how to use command line utilities to clean up corrupted databases.

Windows SharePoint Services 2.0
http://support.microsoft.com/kb/924881
http://support.microsoft.com/kb/918744
From: \program files\common files\microsoft shared\web server extensions\60\bin
To Detect: stsadm -o databaserepair -url http://ServerName -databasename DatabaseName
To Repair: stsadm -o databaserepair -url http://ServerName -databasename DatabaseName -deletecorruption

SharePoint Portal Server 2003
http://support.microsoft.com/kb/919175
http://support.microsoft.com/kb/918742
From: \programfiles\Sharepoint Portal Server\Bin
To Repair: spsadm repairorphans http://ServerName

Friday, June 01, 2007

SharePoint V3: MOSS 2007 Search: How to Index Lotus Notes Content

I recently configured MOSS Search to index Lotus Notes. Here is an overview of the process.

Preparation:
* Lotus Notes server name
* Lotus Notes database file name
* List of fields you want to display in search results
* Notes user logon file (e.g. user.id)
* User credentials for installing Notes client

Steps:
* Install Lotus Notes Client 6.0 to the SharePoint Index Server
* From the index server, share the c:\program files\lotus\notes\data directory allowing WSS_WPG group access
* From an existing workstation, copy a valid user id file to index server c:\program files\lotus\notes\data
* Download the Lotus C++ API Toolkit 3.0I* Extract the files* Copy lcppn30i.dll to the index server, c:\program files\microsoft office servers\12.0\bin
* Rename 1cppn30i.dll to 1cppn30.dll
* From index server, c:\program files\microsoft office servers\12.0\bin, execute notessetup.exe
* Specify the server name, database file, view, etc.
* From index server, cmd prompt, net stop osearch, then net start osearch
* SSP Admin > Search Settings > Content Sources: Configure content source for Lotus Notes
* SSP Admin > Search Settings > Scopes: Configure scope for Lotus Notes content source
* SSP Admin > Search Settings > MetaData Property Mappings: Create managed properties for those Lotus Notes properties that you want to search or display in search results
* Search Center: Configure the search web parts and search results web parts (and related xml files) to display useful field when the search result item is coming from the Lotus content source

Lessons:
* The notessetup.exe won't work with the 1cppn30i.dll file name, need to rename it to 1cppn30.dll
* I used 6.0 Notes Client, because Notes Client 6.5 did not create a data directory

References:
* Configure Office SharePoint Server Search to crawl Lotus Notes (Office SharePoint Server 2007 for Search)
*
Using SharePoint 2007 to Index Lotus
*
Secure crawls of Lotus Notes with SharePoint
*
How to Configure Search to Honor Lotus Notes Security Settings
*
MOSS2007 Search and Index Lotus Notes
*
IBM software downloads (for Lotus C++ API ToolKit)

Monday, May 21, 2007

SharePoint V3: Fresh MOSS 2007 Search Configuration for Medium Server Farm

Description
After configuring and starting MOSS Search, you wish to have a clean configuration. Maybe the indexing process doesn't seem to be working correctly. Or, perhaps there are issues with the propogated index share folder. Or, maybe the crawler doesn't seem to complete its process. Or, maybe the first time around you forgot about your database naming convention and you want to rename the search database to something more relevant. Whatever the issue or reason, the solution below offers a way to gain a fresh start with MOSS search configuration. This solution creates a new search database, it clears the index and propogated index file shares and creates new ones.

Solution
From each of the search servers
* Start > Run > CMD
* net stop osearch

From each of the query servers
* Central Admin > Services on Server
* Stop/Remove MOSS Search (query) from each of the query search servers

From the index server
* Central Admin > Services on Server
* Stop/Remove MOSS search (index)

From the index server
* Central Admin > Services on server
* Note the database name
* Stop/Remove WSS search

From the index server
* Central Admin > Services on server
* Start/Add the WSS Search (this requires creating a new db)

From the index server
* Central Admin > Services on server
* Start/Add the MOSS Search (select only the index checkbox)

From each of the query servers
* Central Admin > Services on server
* Start/Add MOSS Search (select only the query checkbox)

From the SSP
* SSP Admin > User Profiles

* Verify that user profiles have been imported

From the SSP
* SSP Admin > Search Settings
* Verify all content sources, crawl rules, schedules, scopes are configured properly
* Perform a full crawl of content

SharePoint Error: Service Unavailable

Description:
Users receive "Service Unavailable" error when they point their browsers at the SharePoint site

Solution:
* Administrative Tools > Services > SQL Server Service > Log On Tab
Set the identity to a domain user account

Restart the service
* IIS Manager > Application Pools > Application Pool Properties > Identity Tab
Set the identity to a domain user account (e.g. use same as sql server service account)
* Start > Run > IISReset

See Also:
Microsoft Support KB973917: Description of the update that implements Extended Protection for Authentication in Internet Information Services (IIS) http://support.microsoft.com/kb/973917

SharePoint V3: MOSS 2007 People Search Scope, 0 Items

Description:
MOSS 2007 Search is configured but the People scope contains zero items.

Solution:
* SSP Admin > User Profiles and Properties
Verify that user profiles have been imported by looking at the number of profiles
* SSP Admin > Search Settings > Scopes > Scope Properties and Rules
Delete existing rules
Create a new rule where contentclass = urn:content-class:SPSPeople
Set the new rule behavior to "Require"
* SSP Admin > Search Settings > Scopes

Start Update Now

Monday, April 30, 2007

SharePoint V3 Error: The search request was unable to connect to the Search Service

Description:
After modifying SharePoint service account identities, searching results in the error: "The search request was unable to connect to the Search Service."

Solution:
* IIS Manager > Application Pools > App Pool Properties > Identity Tab:
Set the user name and password to the SharePoint Service Account identity
* Start > Run > IISRESET /noforce

Wednesday, April 25, 2007

SharePoint V3: A MOSS 2007 Extranet Scenario of an Internal Parent Site Having Multiple Extranet Sub-Sites

One common extranet configuration of MOSS 2007 is when an organization sets up an internal-only site collection but has multiple external facing sub-sites (perhaps for clients or projects). I have created a sample configuration for this design using a fictitious company called “Wharf Technologies.” This example assumes the following:

* There is one set of internal users (e.g. Wharf employees)
* There are multiple sets of external users (e.g. clients)
* Users and groups are managed in Active Directory
* There is one root site collection called “Wharf Technologies Portal”
* There are many client sub-sites, one per client
* Wharf employees are supposed to have access to the Wharf Technologies Portal, plus all of the client sub-sites
* Wharf clients are not supposed to have access to the Wharf Technologies Portal; they should only have access to their client site
* For demonstration purposes, one of the client organizations is called Awesome Computers
* The Site Collection Administrators and Portal Owners have already been provisioned on the Wharf Technologies Portal
* The URL for the Wharf Technologies Portal is
http://portal.wharf.com
* The Awesome Computers sub-site has already been created, the URL is http://portal.wharf.com/sites/awesomecomputers
* Each client site should have its own URL, available outsidse the Wharf network

Setting up something like this requires several network and SharePoint configurations. Below are steps outlining one approach to achieving these configurations in a sample environment. Keep in mind that there are many different approaches achieving the requirements and this is just one example. In real life you need to consider information security and corporate compliance policies and procedures of both the company hosting the web site and the client companies.

From Active Directory Users and Computers:
Create an AD security group called Wharf Technologies Users
Create an AD security group called Awesome Computers Users

From the Wharf Technologies Portal Site:
Actions > Site Settings > Modify All Site Settings > Advanced Permissions > New > Add Users
Add the Wharf Technologies Users AD group
Give Permissions Directly (Contribute)
Uncheck the option to send welcome e-mail to the new users
Click OK

From the Awesome Computers Sub-Site:
Site Actions > Site Settings > Advanced Permissions > Actions > Edit Permissions
Click OK to the warning message regarding unique permissions
New > Add Users
Add the Awesome Computers Users AD groupGive Permissions Directly (Contribute)
Uncheck the option to send welcome e-mail to the new users
Click OK

At this point the Awesome Computers have access to their site, but not the root site collection.

From Internet Information Services Manager:
Create a new web site called Awesome Computers
On the Web Site tab, provide a host header, awesomecomputers

On the web site tab, set the “content for this resource should come from:” option to “A redirection to URL”
For the “client will be sent to” option, check off “the exact URL entered above”
Set the “redirect to:” field to
http://portal.wharf.com/sites/awesomecomputers/default.aspx

From Active Directory DNS:
Create an alias record mapping awesomecomputers host name to the host name of the Wharf Technologies Portal (e.g. portal.wharf.com)

From Internet Explorer:
Test the redirection web site, awesomecomputers.wharf.com should resolve to the Awesome Computers sub-site

From SharePoint:
If any custom branding has been applied, ensure that NT Authenticated Users group or a similar group has permission to the master page and css files. This will ensure that the branding is visible to the client users.

At this point users should be able to point their browser to
http://awesomecomputers.wharf.com and be redirected directly to the Awesome Computers sub-site of the Wharf Technologies Portal.

The next configuration is to establish public facing access to the Wharf Technologies Portal ip address, port number, and establish external name resolution to the Awesome Computers host name. The configuration requirements of public ip address and name depend on the network hardware that is being used on the network perimeter and therefore vary from organization to organization. External DNS Name propagation make take several hours to complete since it must be updated at the service provider.

The end result is that each client site that is configured is accessible from outside the network, each having their own unique URL, and SharePoint permissions is set up such that client users can only access their own sites.

Monday, April 16, 2007

SharePoint V3: Configure BDC Search Scope, Add Search Tab, Modify Search Scopes Drop Down

In Microsoft Office SharePoint Server 2007 search scopes allow you to define a portion of an index according to content sources and content types. MOSS also supports searching line of business data, such as structured data that exists in a SQL Server database.

The instructions below explain how to create a custom search scope for the Adventure Works DW SQL Database, how to add an Adventure Works search tab, and how to add Adventure Works to the search scopes drop down. This example assumes that the Adventure Works database has already been defined in the Business Data Catalog.

Create and Configure the Adventure Works Search Scope

SSP > Search Settings > Scopes > View Scopes > New ScopeTitle: Adventure WorksTarget Results Page: Use the Default Search Results Page (for now)Click OK
Adventure Works Search Scope > Edit Properties and Rules > Rules > New RuleScope Rule Type: Content SourceContent Source: AdventureWorksDWBehavior: IncludeClick OK

Create Adventure Works Search and Search Results Pages

Navigate to the Search Center
Site Actions > View All Site Content > Pages > New > Page

Title: aw.aspx
URL: Pages/aw.aspx
Page Layout: Search Page
Click Create

Site Actions > View All Site Content > Pages > New > Page
Title: awresults.aspx
URL: Pages/aw.aspx
Page Layout: Search Results Page
Click Create

Configure the Adventure Works Search and Search Results Pages

Open the aw.aspx pageSite Actions > Edit PageSearch Box Web Part > Edit > Modify Shared Web Part > Miscellaneous
Target Search Results Page URL: awresults.aspx
Click OK

Open the awresults.aspx page
Site Actions > Edit PageSearch Core Results Web Part > Edit > Modify Shared Web Part > Miscellaneous
Scope: Adventure Works

Create and Configure the Adventure Works Search Tabs

Open the search.aspx page
Site Actions > Edit Page > Tabs > Add New Page
Tab Name: Adventure Works
Page: aw.aspx

Open the searchresults.aspx
Site Actions > Edit Page > Tabs > Add New Page
Tab Name: Adventure Works
Page: awresults.aspx


Update the advanced search links on each custom search page

Modify the Search Scopes Drop Down

Home > Site Actions > Site Settings > Modify All Site Settings > Site Collection Administration > Search Scopes
Click "Display Group: Search Dropdown"
Edit Scope Display Group
Enable the Adventure Works scope by checking it and assigning it an order number

Friday, April 06, 2007

SharePoint V3: How the Site Directory Works

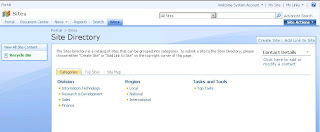
When you create a site collection using the Collaboration Portal template, a site called "Sites" is created by default and it comes wired with a site directory. The out-of-box site directory includes three tabs: Categories, Top Sites, and Site Map.


Categories and Top Sites rely upon information stored in the Sites list while the Site Map is automatically rendered.

When you click the Categories tab, you are viewing the categories.aspx page. When you click the link for a category, you are brought to the categoryresults.aspx page. When you click on the Top Sites tab, you are brought to the topsites.aspx page. When you click on the Site Map tab, you are brought to the sitemap.aspx page.

The aspx pages are stored in the Pages document library (Sites > View All Site Content > Pages).
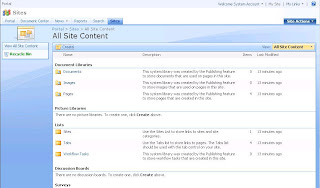


The Categories Tab

The default categories that appear in the site directory are Division, Region, and Tasks and Tools. These are column names in the Sites custom list (Sites > View All Site Content > Sites > Settings > List Settings). The sub-categories (e.g. beneath Region there is Local, National, and International) are column values for the column. In the case of Region, Region is a choice column in the Sites custom list and Local, National, and International are available values for that column.

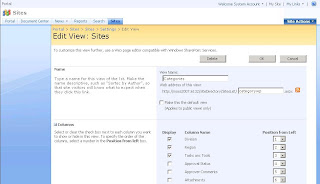
The Sites custom list has several views. The Categories view defines what is shown on the Categories.aspx page. For example, if you open the Categories view (Sites > View All Site Content > Sites > Settings > List Settings > Views > Categories) you will see that the three columns that are checked are Division, Region, and Tasks and Tools. These represent the categories that are visible on the Categories.aspx page.

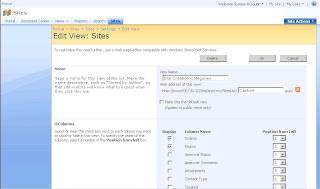
Another important view in the Sites custom list is the Site Creation Categories view. This view defines what categories appear when a new site is created. For example, if you click Site Actions > Create Site you will see that the bottom of the new site page includes check boxes for Division and Region. This is because Division and Region columns are checked in the Site Creation Categories view.


Listing Sites in Site Directory

When you create a new site and indicate that you want it to be listed in the site directory, and you specify which categories you want it listed under, a new list item is created in the Sites custom list. For example, if you click Site Actions > Create Site and you create a site called Test Site 1, listing it under all possible site categories, then a new list item is created in the Sites custom list.
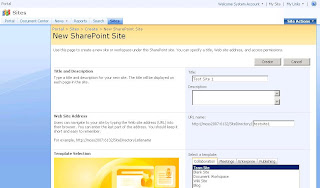
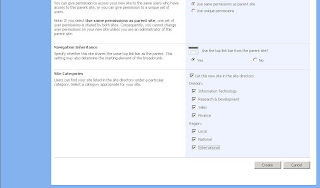


The Division and Region values you specified when you created the site appear as properties data for that list item. Since you selected all of the possible Division and Region values when you created Test Site 1, you can test the way the site directory works by clicking on one of these categories in the site directory.

Navigate to Sites and click on the Local subcategory beneath Region. You will see Test Site 1 listed in the results.


You can add previously created sites to the site directory by creating new list items in the Sites custom list.


Specifying a Different Site Directory

If you delete the default Site Directory site and create a new one you will notice that the site creation options for listing new sites in a site directory are no longer available. In order to associate site creation to a Site Directory other than the default one, you need to specify this new Site Directory.

Navigate to Home > Site Actions > Site Settings > Modify All Site Settings > Site Collection Administration > Site Directory Settings. Here you can define the location of the Site Directory. You can also enforce site creation options from this screen.

Under Promise and Over Deliver

When project sponsors for business application projects are gearing up for a new project they are exposed to products, lingo, marketing material, and all the things that create a buzz. Often times they see demonstrations or presentations that glorify the technologies (that is how these things are sold, right?). Sponsors are sold on ideals. They see a fine tuned demo and are convinced they can have the same thing.

Its great to experience the hype and the excitement of a new project, however, when a project is set in motion a reality check can quickly screech the record player...a message that there are technical limitations preventing a particular goal to be achieved as it was initially designed.

A big part of being satisfied at the completion of a project, is having accurate expectations when the solution design is established. This means being educated about the limitations and obstacles you will face along the way, before you even begin constructing. It also means being cautious about making promises.

Blog Archive

Followers